Showing posts with label sustainable. Show all posts
Wednesday, September 27, 2017
The Anytime Frittata
I might otherwise call this the end of summer frittata, but we just rolled over into fall officially. I'm still using up the slowly fading harvest of the heat as the tomatoes, peppers and basil have hit their peaks and appear to be ready for retirement. I'll be making a ton of pesto to freeze, pickling an assortment of peppers for the pantry and stewing some tomatoes with garlic chives for those tasty pastas, lasagnas, manicottis, pizzas and calzones. How wonderful it is to be able to savor the flavor of summer well into the winter when we get snowed in, become wracked with cabin fever and are left to spend our time hovering around the oven and stove, creating delicious things to eat. Preserving, pickling, canning, freezing and fermenting are incredible ways to extend the life of your garden and get creative with sustainable practices that not only bring us tasty joy, but reduce our kitchen cook print.
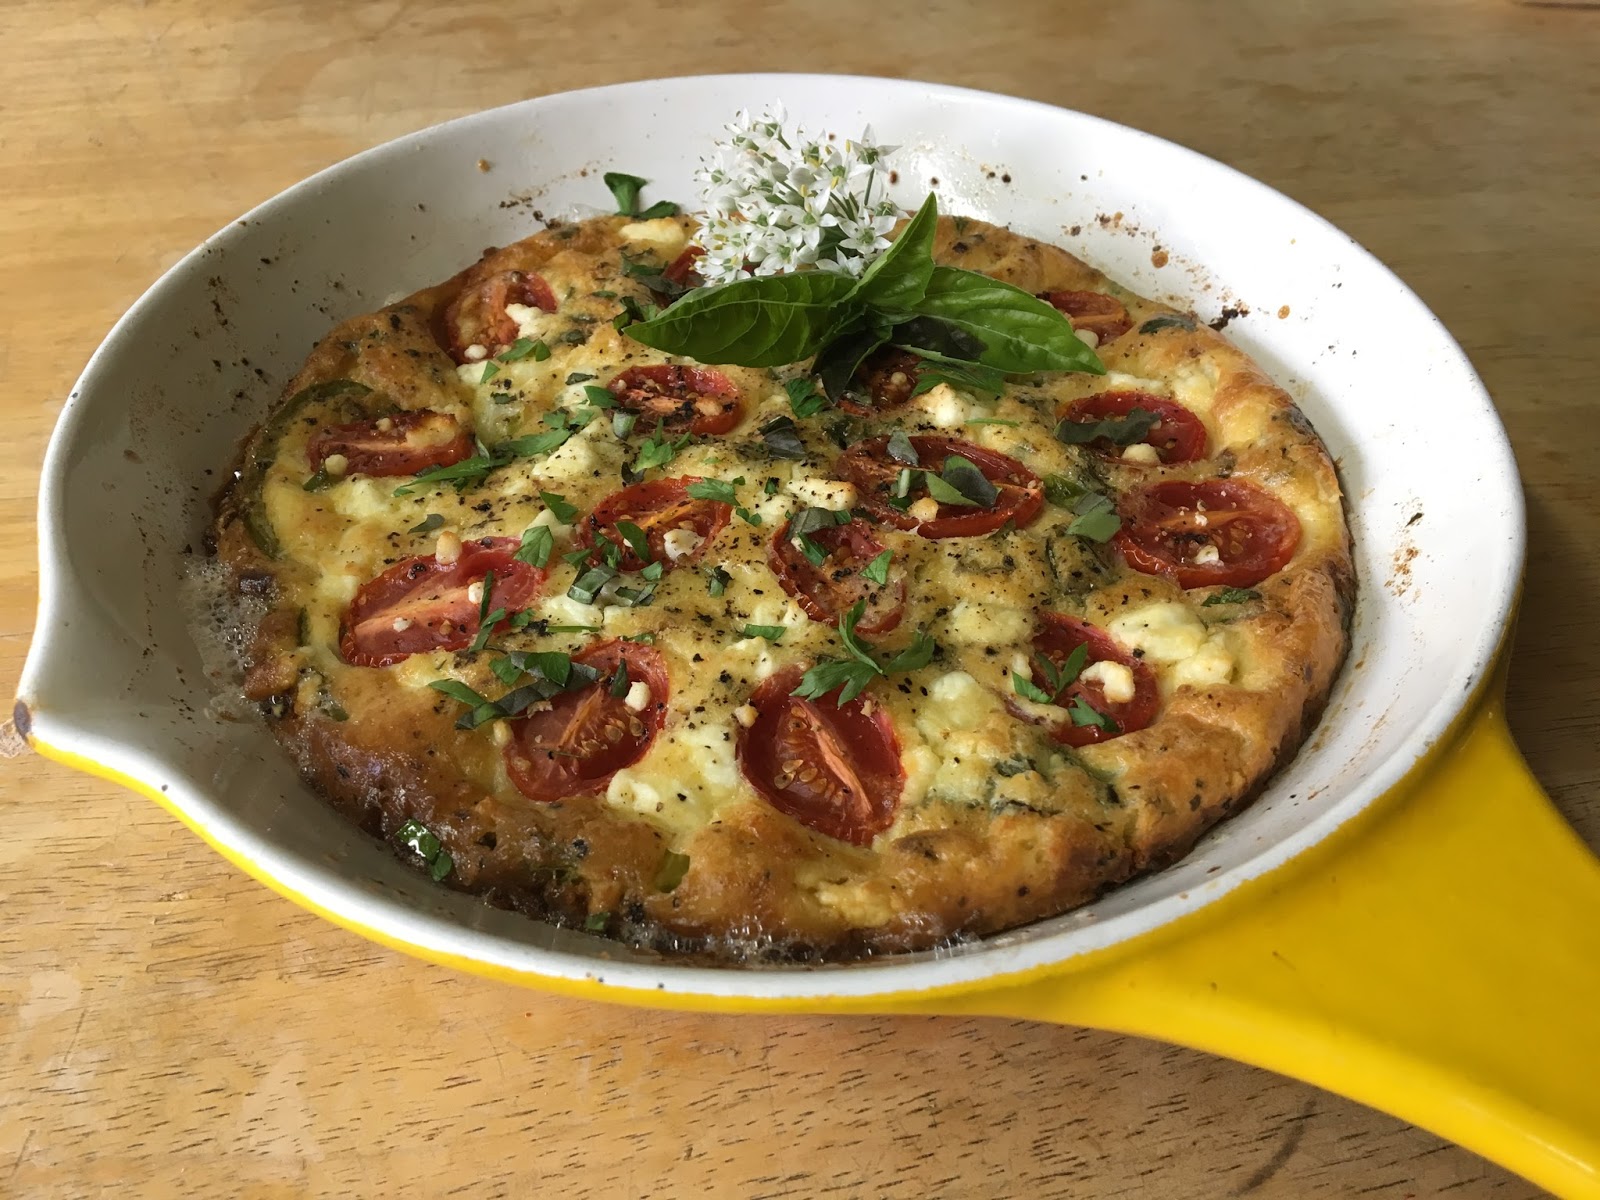
Frittatas are about the easiest, one - pan dishes you can make that is suitable any time of the day. I take the opportunity to clean out the crisper and use any excess produce on hand. The combinations of ingredients are limitless and I've found one that nearly suits everyone in my family. The only tools you need are a cast iron skillet and a wooden spoon. I like using my enamel coated one because the egg doesn't stick so badly to it as it does the raw iron. Both will work, but one is tougher to clean. Furthermore, choose the one that is the right size according to how many you want to serve. This is an 8 inch pan and made four lovely servings. Pair it with a fresh salad and you have a perfect plate.
INGREDIENTS
For a basic frittata, make a base of eggs and a little milk or cream. This is basically a crustless quiche. The ratio of 2 - 3 eggs to about 1|4 cup of milk works well and will give you a nice custard.
For this variety, I used these other optional embellishments.
5 - 6 spears asparagus, ends trimmed, stalks chopped, tips reserved
1|4 c red onion, diced
5 - 6 cremini mushrooms, medium to large, thick sliced
2 cloves garlic, minced
1|2 bell pepper, any variety, chopped
5 - 6 large cherry tomatoes or grape tomatoes, halved
crumbled goat cheese
fresh parsley, basil, garlic chives
nutritional yeast
grass - fed butter + good olive oil
salt + pepper + crushed red (or diced jalapeño)
DIRECTIONS
Preheat your oven to 375 degrees. Warm your pan on medium high and gently warm the olive oil until it glimmers. Sauté the onion and bell pepper for about 5 minutes until softened. Add the garlic, mushrooms and asparagus stems. Season everything with salt + pepper + crushed red until just right for your taste. Add 1 -2 tablespoons of butter, the fresh herbs (reserving a little for garnish), nutritional yeast (a few shakes or a palmful) and mix everything together well. Turn off the heat. Mix your eggs and milk together in a bowl and pour right over the vegetables. Arrange the asparagus spears on top with the tomatoes. Crumble the goat cheese all over and bake until golden brown around the edges and little bubbles begin to form and brown across the top, about 30 minutes for this size pan. Up to 40 - 45 for a ten inch or larger. Check the center with a toothpick. It should not be wet and should be firm in the middle if gently pressed with your finger. Serve with a side salad and a basic vinaigrette and some crusty french bread, if desired. It's good for mopping up your plate!
ENJOY!
Tuesday, November 19, 2013
Herbed Seed and Nut Crackers
The philosophy behind Urban Homesteading is to find a balance between what we consume and what can make ourselves. We all know that our food is fresher in taste and quality when prepared in our home kitchens. The ritual itself eliminates the need for preservatives and reduces consumer packaging, meaning less waste, more sustainability. Though it's more time consuming than hopping over to the store, I think you'll find that carving out a little time to make something yourself will leave you with a feeling of pride and accomplishment. What have we sacrificed in order to maintain our health? A little television time? Compulsively checking email? I have no doubt that everyone leads a busy life in one way or another so what I'm getting at is, find a time when you can devote an hour or so to creating something delicious and healthy for yourself and your families. It will inspire you to share your success with others which in turn creates a higher consciousness in communities as we inspire, lift up and co-author our lives together.
These crackers are really high in plant based protein, omegas and fiber. The addition of fresh herbs greatly enhances their artisan like quality and makes them really good with a cheese plate, fresh tomatoes, other nut cheeses and spreads.
This is yet another recipe where I get to use my almond meal in place of flour for a gluten free pastry like cracker that is light and fragrant. The sesame seeds make it really nutty and the cashews have a creamy note. I use flax and chia meal in just about everything possible, which is really easy to make yourself. You can buy the whole seeds and put them into a coffee bean grinder or small food processor. If you don't have either of those, they are also available in powder form.
Picking fresh herbs for a meal is so satisfying. It's really worth the investment to start a kitchen garden. These herbaceous perennials are my constant companions. Rosemary, Thyme, Oregano and Lavender are evergreen so I get to use them all year long. Other tender herbs like Basil, Cilantro and Parsley only grow as an annual in Oklahoma. These can still be enjoyed in small pots indoors during cold weather, and pinched until spring when they can be transplanted outside again.
You can also preserve the delicate flavor of herbs by chopping them and making herbal vinegars or infused oils which makes a great marinade for vegetables, chicken and fish. Another easy way to keep them over the winter is to fill ice cube trays half full and top with olive oil. Wrap with a few layers of plastic wrap and they can be thawed quickly in a saute pan or soup.
I love this miniature chef's knife. Perfect for herbs and tiny things. Rosemary goes through a secondary flowering in the fall and puts on little purple blooms that make a pretty garnish for your dish when you are plating up.
This dough is made in the food processor, then wrapped in plastic and chilled in the refrigerator for an hour or overnight. It's so beautiful and simple with flecks of green herbs and sesame seeds running through it.
After you take your dough out of the refrigerator, put it between two pieces of parchment paper and roll it out with a rolling pin to about 1|8 inch thin. Thicker than that, the crackers won't be as crispy and thinner than that, they will fall apart and can't retain their cracker shape. I like the irregular edges.
Using a pizza wheel or sharp knife, cut the dough into what ever shape you like. You can do triangles or rectangular bistro style cuts. There is no real science to this part. Do letters or hearts with a cookie cutter - have fun!
The aroma of these cooking is quite heavenly. I love cooking smells in the home. It's always been a source of comfort for me. I come from a long line of green thumbs and homesteaders. These sensory images are something I have always known.
INGREDIENTS
1|2 cup almond meal
1|2 cup raw cashews
2 tablespoons flax|chia meal
1|3 cup sesame seeds
2 tablespoons freshly chopped herbs such as thyme, rosemary, oregano or a combination of them
1|2 teaspoon sea salt
1 tablespoon maple syrup
1 tablespoon coconut oil
2 tablespoons filtered water
DIRECTIONS
Combine the almond meal, cashews and flax meal in a food processor and pulse until it is evenly ground. Add the sesame seeds, herbs, half of the sea salt, maple syrup and the coconut oil until combined. Add the water a little at a time until everything starts to stick together. Form the dough into a ball and wrap in plastic wrap. Chill for a minimum of one hour or up to overnight.
Preheat your oven to 325 degrees and line a rimmed baking sheet with parchment paper.
Remove the dough from the refrigerator and put it between two pieces of parchment paper. Roll it out to 1|8 inch thick. Cut the crackers into a desired shape. Using a sharp edged spatula or pastry knife, gently lift the crackers up and place them 1|4 inch apart on the prepared baking sheet. Bake the crackers 12-14 minutes, rotating the pan halfway through the cook time. The edges should be toasted, light brown and crispy. Sprinkle the remaining sea salt on top upon removing. Let cool completely.
Serve these with the Lemon Rosemary Cashew Cheese or your favorite hummus. I think they would be good with any kind of creamy addition and of course fresh tomatoes. Add them to a fruit and cheese plate for the holidays or serve with a hearty soup. The possibilities are endless!
ENJOY!!
Monday, October 14, 2013
Take Stock
I have seasonal rituals. Making my own vegetable stock is one of those ultra - comforting, no waste things that I do in the fall and winter. We save a portion of our good vegetable scraps for this while the rest is composted. The things we keep are onion tips, garlic paper, asparagus ends, mushroom stems, carrot tops and celery fronds, the occasional squash or zucchini and always the stems from herbs like parsley, thyme and rosemary. We store it in large freezer bags. When there is enough for a giant pot of stock which usually amounts to two or three gallon bags, we put soup on the menu. This is really one of the most easy things you can do to ensure you have organic vegetable stock on hand at all times for soups, sauces, dressings and marinades.
A note on ingredients: It's best to avoid using cruciferous vegetables like broccoli and cabbage because of the sulfur compounds. They become bitter and overly gassy when cooked for too long and are best eaten blanched on their own. Peppers are okay but can have a similar effect and can overwhelm the flavor if you use too many of them, so be modest. Potatoes are good if you want to add a little starch or bulk to it. Typically, I leave all of these out and compost them.
Simply dump everything into a giant pot, cover with filtered water, a tablespoon or so of sea salt and let it simmer about an hour. The result is a gorgeous broth with a deep, rich color that enhances the flavor and nutritional profile of everything.
The finished stock can be portioned into quart freezer bags and laid flat on top of each other in the freezer for later use. They thaw almost instantly when put under cool running water. You could also pour it into ice cube trays for smaller portions to deglaze with as a tasty alternative to water or wine.
The beginning to all good soups start with a mirepoix. This is a French term for the traditional, flavorful base used to enrich soups, sauces, roasting brines, gravies and marinades. Though mine more closely resembles a soffritto, which is the Portuguese version, you can make deviations to the basic recipe which is carrots, onions, celery and garlic. Saute these in some good olive oil until they become soft and you start to see some brown caramelization on the bottom of the pan. This is when you deglaze the pot with your choice of liquid to pull all of that delicious flavor up from the bottom to get it into your dish. You can use stock, wine or water. It will bubble and come right up. Then you can add the rest of your stock and ingredients.
BASIC VEGETABLE STOCK
Scraps of onion, garlic, carrot, celery, mushroom, asparagus, squash, potato and herbs and 1 tablespoon good sea salt to draw out flavor and minerals into the water. Cover with filtered water.
Bring everything to a boil, then reduce to a simmer and cover for about an hour. Strain into a large bowl. Compost the cooked scraps and return the stock to the pot if using immediately. Otherwise, allow it to cool. Fill quart or gallon freezer bags and lay flat in your freezer for later use.
ORGANIC CHICKEN SOUP FROM SCRATCH
Since the chicken is the star of this soup, it really is worth a few extra dollars to use an organic, whole chicken as opposed to breasts or fillets.
1 whole chicken
carrots, sliced
celery, sliced
garlic, chopped
fresh parsley
sliced jalapenos (optional of course!)
wide egg noodles or your favorite soup noodle or homemade dumplings
salt + pepper
DIRECTIONS
I left the amounts loose on the soup because some people like it chunky and others brothy. There's a whole secret life behind soups. It's one of those real art forms that are unique to everyone. Experiment and find your soup profile.
Start your mirepoix as described earlier. Deglaze with the broth you made. Add the whole chicken and bring to a boil. Reduce to a simmer and cover for 40 minutes or until you start to see it falling off the bone. Remove the chicken carefully with tongs and put it into a large bowl. Have another bowl handy to put the cleaned chicken into. With two forks, start pulling it apart gently and separating the skin and the fat from the tender meat. When you're finished, return the good stuff to the pot and add the sliced carrots and celery. Simmer another 15 minutes then add your noodles and parsley and season with salt and pepper. Let the flavors marry about 20 minutes more and it's perfect. Ladle into soup bowls and top with sliced jalapenos for optimum nutrition, to aid in digestion and metabolism, to cleanse your blood, flush toxins and for a kick of vitamin C. Serve with a fresh green salad and toast, crackers or croutons.
ENJOY!
Wednesday, May 22, 2013
Composting 101
Getting started can be overwhelming, but in fact, it's incredibly simple. It begins with your trash and your household waste. Most people already separate their recyclables. The second step is to designate a bowl for your kitchen with a lid that you can start to separate your organic waste into. You can purchase compost bowls at kitchen stores, but I've found that a good, big bowl with a lid is sufficient. What is suitable to compost? Fruit and vegetable scraps, coffee grounds, tea bags, egg shells, egg cartons and most plant based scraps in moderation. Be wary of cartons that contain dyes and print, however. The rest of your household paper and cardboard can be recycled instead. What is not suitable to compost? Animal products or waste and inorganic materials. When my kitchen bowl is full, I empty it into a large bucket that I keep on my back porch. When that bucket is full, I dump it into the active bin. I keep everything separated into three bins and stages of decomposition. The active one is where I deposit the current waste, grass clippings and small yard waste and leaves. The other two are in two stages of material based on rough waste that needs more time to break down and one which holds the overflow of amendments. The basic principle to compost is that food waste is mixed with dead leaves or dried plant material which emits carbon and with green material which emits nitrogen. The food waste is always covered. You will need to water your pile occasionally to keep the bacteria active. A good pile is hot in the middle which means it is active. It needs to be turned once a week and tended a little. You can purchase an organic accelerator at any garden store that is a granular bacteria you add to a watering can and add to your pile in order to stimulate the production of good bacteria. Designate a place that is away from the house where you can begin. It attracts bugs and pests, which is good, but that's why you don't want it close to your house. You don't have to have any special equipment like a tumbler or a store bought bin. Enclosing it on three sides with any material works to keep it contained and will increase the heat.
This is the active pile where I have just added a bucket of new material that now gets turned into the existing material and completely covered.
When the compost is ready to use, it looks like dark, rich soil. We call it black gold. This can now be added to your garden as a top dressing and used like fertilizer for existing plants or turned into the top inch of a new bed you want to prepare to receive new plantings.
My four year old loves working in the garden as much as I do and since I home school him, we are in our outdoor classroom every day, even in the winter. He has his own set of long handled tools and a wheel barrow too. Here, he is helping me turn our new batch into our Spring beds.
Homegrown compost (in lieu of store bought bags) will always be superior. The food you grow with it is later recycled into more compost for more food. It is the ultimate in sustainable practices. I love digging through my beds and finding the shell of an egg I ate or a dried up avocado skin. Look at these incredible beets that we grew this winter with it!
Our beds are so green, happy and healthy because of the quality of the soil we grow. Your plants will reflect the integrity of the nutrition content in the ground and will return the favor!
Pictured here is the pathway leading into the perennial herb beds featuring Lavender and Rosemary and an abundance of greens on the right such as romaine, mustard greens, swiss chard, beets, spinach, Dill and Chervil.
In the Spring and Summer, it is tough to do anything else but luxuriate in the beautiful mazes of The Fortress. Pathways lead to strawberries, garlic and lettuce, flowers swarm with bees and butterflies, hummingbirds dart about, birds are in constant song, fragrant herbs stimulate your senses as you brush by them and cats lounge in the cool shade. This is my faithful head space, my heaven.
I am truly happiest when I am surrounded by flora, fauna and the wonders of nature.
Subscribe to:
Posts (Atom)
