Showing posts with label breakfast. Show all posts

Tuesday, September 8, 2020

Chocolate Chip Tahini Cookie Cake


I'm not sure what I love more between a soft, chewy bar and a crispy cookie top, so this recipe gives you both. Something quite magical happens when you add tahini to something sweet. The earthy, nutty flavor is different than using a traditional peanut or almond butter and there's a bit of a complexity when paired with other nuts - in this case, walnuts. This is a gluten free treat that has another amazing component that really raises the nutritional profile and incorporates an awesome, no - waste kitchen hack for repurposing your leftover pulp from juicing. You would never know that carrot, celery, lemon and apple pulp were added to this batter! It gives a little additional moisture to the texture and can totally be omitted, of course. I was just looking for a way to use it up. The remainder of it I froze and will be using in my next soup stock. All the winning. The finishing touch for these is a little drizzle of tahini on top just before devouring.

INGREDIENTS

  • 1/2 cup raw tahini
  • 1/4 cup melted coconut oil
  • 1 t vanilla
  • 1 egg
  • 1 cup almond flour
  • 3/4 cup coconut sugar
  • 1/4 t baking soda
  • pinch sea salt

Optional embellishments

  • dark chocolate chips
  • chia or flax seed meal
  • hemp hearts
  • chopped, toasted walnuts
  • dried fruit
  • shredded coconut

METHOD

Preheat oven to 350. Generously oil a square or medium sized baking dish with additional coconut oil. Mix the wet ingredients into a medium bowl. Mix the dry ingredients separately then slowly add into the wet bowl, folding with a rubber spatula until completely combined. Press the batter into the baking dish using your hands to ensure it gets into the corners well. Sprinkle the top with additional chocolate or coconut and bake 25 minutes until the edges start to crisp but the middle is still slightly soft. Let the pan cool almost completely before slicing - it's worth the wait! Drizzle with additional tahini if desired. Store in the refrigerator.

ENJOY!


Wednesday, April 17, 2019

Apricot Walnut Bars


These bars are a not-too-sweet treat that are perfect for breakfast and tea or coffee, warmed up of course. The filling is gooey and slightly tart with addition of the lemon zest. The chia seed and applesauce really bind the crust together beautifully in that these are gluten free. The crust also doubles as the crumb topping and gives them great texture. Pack them for an on-the-go snack, traveling, school lunches and mid-day snacking. They are also vegan and sugar-free except for the 2 tablespoons of maple syrup. High in fiber and rich in omegas and plant proteins, they win big time. I adapted this recipe from the book My New Roots written beautifully by Sarah Britton. Her book is beautifully done and seasonally inspiring.


INGREDIENTS

CRUST
1 1/2 T chia seeds
1 c gluten free oats
1 c raw walnuts, toasted
1/4 c applesauce 
2T maple syrup
1T melted coconut oil
1t vanilla extract
1t sea salt
1t baking powder

FILLING
2c dried apricots roughly chopped(or figs)
1\2 T cinnamon
1\2 t ground ginger
1\2 c applesauce
grated zest of 1 organic lemon
1/4 t sea salt


METHOD

Preheat your oven to 350 degrees. Lightly toast 1cup of the walnuts on a sheet pan. This will only take a few minutes, so be careful not to burn them. When they are slightly fragrant and golden, pull them out and set aside to cool.  Mix the chia seeds with 1/4 c water and set aside to gel.

Make the crust by adding 1 cup of the oats to a food processor and blend until you have a coarse flour. Add the toasted walnuts and pulse again until the mixture resembles a sandy-textured meal. Add the chia gel, applesauce, maple syrup, melted coconut oil, and vanilla. Pulse until moist.

In a medium bowl, combine the remaining 1 cup of oats, salt and baking powder. Add the blended mixture from the food processor to the bowl and mix together using wet hands. The dough is a little sticky. Press about 2/3 of the dough into the bottom of an 8 inch square baking dish that has been rubbed down with a little coconut oil. 

Rinse the food processor bowl out - no need to wash it. Make the filling by adding all of the chopped apricots and the remaining ingredients. Blend on the highest setting until you get the consistency that you like. I like mine a little chunky with some texture but you can make it completely smooth if you prefer. Pour this on top of the crust. Drop the remaining crust on top of the filling in little chunks or dollops with your hands. Lightly chop the remaining cup of walnuts and pour them on top as well, filling in any empty spots, then press lightly with your palms. Bake for 25-30 minutes until slightly golden on top and fragrant. Let cool completely before cutting. Store in the fridge, covered for up to 5 days.


Wednesday, September 12, 2018

Paleo Fusion Tostadas


In an effort to reduce my intake of grains, I've been experimenting with recreating some dietary staples such as bread, tortillas, baked things and various crusts. These tostada shells are made from almond flour which give them a crispy, pastry quality that is something between a pie crust and a flatbread. I've been reading the book Grain Brain, which is an interesting and informative perspective on those deeply affected by the spectrum of grain-gluten sensitivity and intolerance. I've also been deeply diving into the personal story and cookbook Against All Grain, which also offers more perspective on the effects of our GMO crops and they have affected our evolving biology. I am personally not on either end of the spectrum with regard to my own body's digestive process, but somewhere in the middle. If you are exploring these topics, I highly recommend checking out both books.


This recipe uses blanched almond flour, fresh lime juice + cilantro. They are baked, not pan-fried which keeps them light and crisp. I'll include various substitutions for the ingredients that work just as well so that you can play around with them and find the one that is best for you, whether that is vegan or purely paleo.


INGREDIENTS

2.5 c blanched almond flour, or a combination of your choice nut flour + GF oat flour
1 t sea salt
1|2 t baking soda
2 T olive oil, or coconut oil
2 large eggs, or equal parts flax egg ( 1 T flaxseed meal + 2.5 T water per egg)
2 t chopped cilantro, or herbs of choice to fit your recipe for toppings
1 t lime juice, or lemon or orange or even apple cider vinegar

METHOD

Preheat oven to 350 degrees. Line a baking sheet with parchment paper. Mix all ingredients together in a bowl or food processor until a dough forms. Portion into 6-8 balls and roll between your hands until smooth. If you have a tortilla press, this works really well for these by pressing each ball between two pieces of parchment paper until about 1|8 inch thick. This can also be done by using a rolling pin, still keeping each one between parchment and rolling out to about 6 inches wide. Transfer each one gently to the sheet pan and bake for 18 minutes, flipping each one and rotating the pan halfway through at about 9 minutes. Transfer to a cooling rack to ensure crispiness.

As always, there are many optional embellishments for ways to build a tostada. The ones pictured here are loaded with a black bean puree, shredded greens + cilantro, chopped pickled jalapeños + carrots, my pickled red onions, shredded chicken, labne (or greek yogurt or sour cream), avocado and  chili powder.

ENJOY!

Wednesday, September 27, 2017

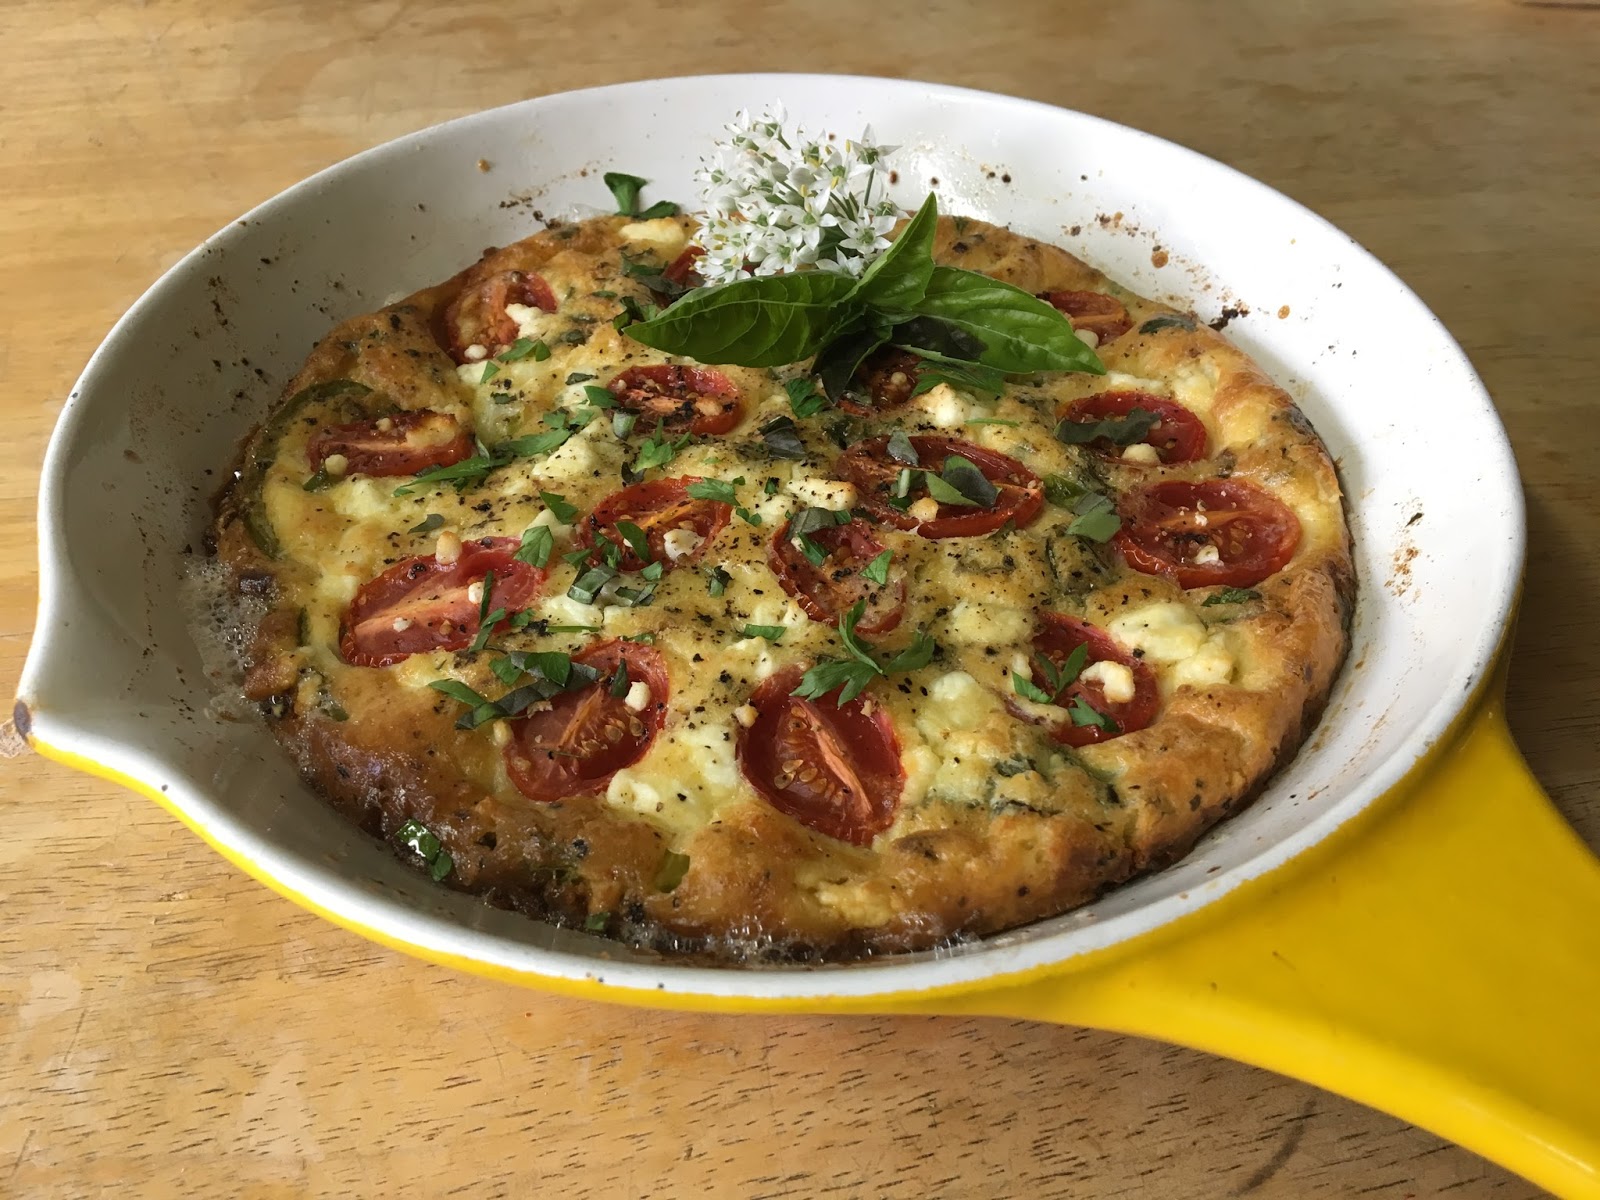
The Anytime Frittata


I might otherwise call this the end of summer frittata, but we just rolled over into fall officially. I'm still using up the slowly fading harvest of the heat as the tomatoes, peppers and basil have hit their peaks and appear to be ready for retirement. I'll be making a ton of pesto to freeze, pickling an assortment of peppers for the pantry and stewing some tomatoes with garlic chives for those tasty pastas, lasagnas, manicottis, pizzas and calzones. How wonderful it is to be able to savor the flavor of summer well into the winter when we get snowed in, become wracked with cabin fever and are left to spend our time hovering around the oven and stove, creating delicious things to eat. Preserving, pickling, canning, freezing and fermenting are incredible ways to extend the life of your garden and get creative with sustainable practices that not only bring us tasty joy, but reduce our kitchen cook print.

Frittatas are about the easiest, one - pan dishes you can make that is suitable any time of the day. I take the opportunity to clean out the crisper and use any excess produce on hand. The combinations of ingredients are limitless and I've found one that nearly suits everyone in my family. The only tools you need are a cast iron skillet and a wooden spoon. I like using my enamel coated one because the egg doesn't stick so badly to it as it does the raw iron. Both will work, but one is tougher to clean. Furthermore, choose the one that is the right size according to how many you want to serve. This is an 8 inch pan and made four lovely servings. Pair it with a fresh salad and you have a perfect plate.


INGREDIENTS

For a basic frittata, make a base of eggs and a little milk or cream. This is basically a crustless quiche.  The ratio of 2 - 3 eggs to about 1|4 cup of milk works well and will give you a nice custard.
For this variety, I used these other optional embellishments.

5 - 6 spears asparagus, ends trimmed, stalks chopped, tips reserved
1|4 c red onion, diced
5 - 6 cremini mushrooms, medium to large, thick sliced
2 cloves garlic, minced
1|2 bell pepper, any variety, chopped
5 - 6 large cherry tomatoes or grape tomatoes, halved
crumbled goat cheese
fresh parsley, basil, garlic chives
nutritional yeast
grass - fed butter + good olive oil
salt + pepper + crushed red (or diced jalapeño)


DIRECTIONS

Preheat your oven to 375 degrees. Warm your pan on medium high and gently warm the olive oil until it glimmers. Sauté the onion and bell pepper for about 5 minutes until softened. Add the garlic, mushrooms and asparagus stems. Season everything with salt + pepper + crushed red until just right for your taste. Add 1 -2 tablespoons of butter, the fresh herbs (reserving a little for garnish), nutritional yeast (a few shakes or a palmful) and mix everything together well. Turn off the heat. Mix your eggs and milk together in a bowl and pour right over the vegetables. Arrange the asparagus spears on top with the tomatoes. Crumble the goat cheese all over and bake until golden brown around the edges and little bubbles begin to form and brown across the top, about 30 minutes for this size pan. Up to 40 - 45 for a ten inch or larger. Check the center with a toothpick. It should not be wet and should be firm in the middle if gently pressed with your finger. Serve with a side salad and a basic vinaigrette and some crusty french bread, if desired. It's good for mopping up your plate!

ENJOY!


Thursday, March 16, 2017

Dark Chocolate Superfood Cookies


I've posted this recipe before but it's been a while and recently some readers were having a hard time locating in the archives, so I thought I'd post an updated version with a minor tweak and suggestions for modifying it if you were vegan. They're already gluten free. So, in a nutshell, these are incredibly healthy + super delicious. They're my kids favorite treat, so that works for me. I'll let them have one or sometimes two anytime of the day because they are low in sugar but still plenty sweet to satisfy that craving. You can take this basic cookie recipe and substitute the embellishments to suit your preferences, which is how all good recipes should read. And these cookies turn out perfect every single time I make them, so that should give you some confidence diving in if you've ever felt intimidated or frustrated with getting your cookie just right. Soft on the inside and a little crispy on the outside. I've been asked for these at gatherings many times so I guess it's one of my specialties. If you want to make them vegan, substitute coconut oil for the butter. There are lots of egg substitutions but many of them alter the flavor because they're typically applesauce or a banana. I like to make a flax egg because it maintains a neutral flavor and the outcome is nearly identical. To make a flax egg, take 1 tablespoon of milled flax seed or flax meal (same thing) and mix it with 2 tablespoons of water.  Let it sit for 15 minutes until it starts to coagulate - the texture will be like egg white.

INGREDIENTS
1 cup gluten free flour - almond, oat or a store bought blend
1|4 tsp xanthan gum (this mimics the gluten)
1|4 cup flax or chia meal (optional but recommended)
1|2 tsp baking soda
1|8 tsp vanilla salt or sea salt
1 egg or substitute (egg should be room temp)
1|2 cup coconut sugar
1|2 cup high quality butter (I like grass fed, organic or clarified) or coconut oil, both at room temp
1|2 tsp good vanilla
1|2 cup dark chocolate chips
1|4 cup chopped nuts (toasted almonds or walnuts)
1|4 cup oats (also optional) shredded coconut or raisins are also good
2 tablespoons Philosophie Superfood Coconut Butter (also optional but an incredible investment)

METHOD
Preheat your oven to 375 degrees. Using a hand mixer or by hand with a spoon, mix the dry ingredients together (the first five). In a second bowl, mix the wet ingredients together starting with the butter and the sugar until creamy and fluffy. Add the egg and the vanilla and the Philosophie if using. Add the dry ingredients to the wet and mix until just combined. Stir in by hand the optional stuff - chocolate chips, nuts, oats, coconut, raisins etc. Spoon into tablespoons onto a non stick baking sheet. Bake one direction for 6 minutes then rotate the pan and bake for another 6. You're done! Cool for 10 minutes then ENJOY!

Wednesday, October 12, 2016

Creamy Superfood Overnight Oats


If you want to maximize your intake of super foods and minimize your prep time, this is about as easy as it gets. Preparing these oats the night before makes your morning a snap, especially because you can take them with you to work or in the car. It's actually less prep than making a smoothie which is where most people try to cram in as many beneficial food supplements as possible to get your nutrient dense breakfast all in one jar. There are a million variations of overnight oats out there so picking your favorite toppings is the only hard part. These literally soak 6-12 hours and become thick and creamy while still retaining some wonderful texture. The addition of chia seed and flax meal really give it some body and the soaking liquid can be modified for vegan diets by using your favorite nut milk, like almond, hemp or coconut for example, and by substituting coconut cream for greek yogurt. I've written out the basic recipe here and included lots of healthy suggestions for keeping it power packed, filling and super easy! I'll be making this for breakfast for the Big Om Yoga Retreat this weekend with a toppings bar and lots of fresh fruit for all of the hungry yogi's that will be practicing. I cooked for this lovely group of people earlier this summer and had a wonderful time being of service, nourishing happy healthy bodies! There's still a couple of days to sign up if you feel the calling to do so. Follow the link above to look at the details for registration - I would love to see you there!


Basic Overnight Oats

For one large serving, or two small. Pick a jar with a glass lid preferably. This hinged clasp jar works perfect but use whatever you either already have on hand, or spend a few dollars investing in one that you love. After all, our food containers are holy vessels and contain our life force!

1|2 c rolled oats (if you are gluten sensitive, make sure your oats are labeled as gluten free)
1|3 c plain greek yogurt or coconut yogurt or coconut cream
2|3 c unsweetened milk of your choice
1-2 T chia seed and ground flax meal
1|2 t vanilla extract or vanilla paste
pinch of salt (I use vanilla salt - it's incredible)
1-2 T natural sweetener such as maple syrup or raw honey (optional)

Mix everything together in a bowl until creamy, then transfer to a glass jar to store in the refrigerator either overnight (preferred) or for at least 4-6 hours.

There are many optional embellishments to take this to another level.
Bee pollen
Hemp hearts
Fresh berries, bananas, mango or figs
Dried fruit like raisins, cranberries, papaya or dates
Coconut flakes
Raw cacao nibs + cacao powder
Pumpkin puree
Cinnamon, nutmeg or clove
Nuts or seeds
Pomegranate
Lemon or orange zest
Almond or pecan butter
Spirulina

These are of course just a few in a line of many. When your oats are ready, choose your favorites and you've got something tasty, creamy and nutritious that will keep your blood sugar steady and give you lots of heart healthy fiber.

ENJOY!


Thursday, December 3, 2015

Chocolate Chip Blondies


These bars are something between a cookie, a cake and a brownie. They're super soft and so delicious the next day. Right out of the oven, they're a little crumbly and are best if allowed to cool for at least 30 minutes before devouring. I am always looking for a good modification on any recipe that both increases the nutritional profile and of course improves flavor. These blondies are gluten free and can be made vegan by substituting coconut oil for the butter. They're egg free, sugar free and contain a deceptively nutritious ingredient that you won't believe! Chickpeas! They make these moist and a little creamy while not losing any of the classic flavors of a chocolate chip cookie. It also makes them very high in protein, fiber and amino acids. What a win! My kids devoured them and had no clue they were anything less than a rich, calorie-laden treat when they were actually anything but. This recipe is not a healthier substitution for the 'real thing', they're just plain healthy for you. We also ate them with a scoop of ice cream, which could also be made vegan by using Coconut Bliss or Rice Cream. I suggest trying all of these!

INGREDIENTS
1 c cooked or canned chickpeas
1|3 c almond butter
1|2 c butter or coconut oil at room temperature
1|3 c maple syrup
2 tsp vanilla extract
1|2 c sorghum flour
1|4 c almond or oat flour
1|4 c tapioca flour
1|2 tsp xanthan gum
1|2 tsp baking powder
1|4 tsp baking soda
1|4 tsp sea salt
1|2 c dark chocolate chips

DIRECTIONS
Preheat oven to 350 degrees. Grease an 8x8 baking dish with butter or coconut oil. Blend the chickpeas, syrup, butter or coconut oil, almond butter and vanilla in the food processor or beat in a bowl with a hand mixer. In a medium size bowl, whisk together the dry ingredients except for the chocolate chips. Pour the wet ingredients into the middle of the dry ingredients and blend until smooth. Fold in the chocolate chips. Of course, there is room for many optional embellishments such as shredded coconut, chopped nuts or white chocolate. Have fun with your recipe and make it just what you like! Pour the batter into the baking dish and bake for 40-45 minutes. Allow them to cool for half an hour before cutting or eating. This recipe sets up beautifully overnight. Wrap your cooled pan with two layers of plastic wrap and leave it at room temperature. Refrigeration has a tendency to dry them out. They'll be gone before you know it!

ENJOY!

Friday, August 28, 2015

Crispy Zucchini Fritters


Here's one of those winner recipes that is so versatile, it can be eaten and served any time of the day. The addition of the tangy, lemony yogurt makes it a perfect snack or meal, along with a nice piece of fish or chicken and a fresh tomato salad or eggs. There is always room to make anything vegan or gluten free with a some basic substitutions, which make the best recipes, in my opinion. They are easily made ahead of time, refrigerated and reheated or frozen and baked. I adapted this recipe from the Smitten Kitchen and then modified it a little, as usual. You can also substitute potatoes for part or all of the zucchini and add other things like kale, mushrooms or onions. Serve them as an appetizer on a bed of wilted greens and thin out the yogurt into a dressing by adding extra lemon juice or a little vinegar. Warm and satisfying, these fritters will have you doubling the recipe in no time just so you can eat one more!

INGREDIENTS
1 medium zucchini, ends trimmed
4-5 mushrooms, sliced thin
2 scallions, finely minced
1 egg or vegan egg substitute
1|2 cup flour, all-purpose or gluten free
1|2 t baking powder
sea salt + pepper
crushed red pepper or cayenne to taste
pinch of garlic powder
1|2 t nutritional yeast
olive oil

LEMONY YOGURT
1|2 cup greek yogurt or coconut yogurt
1|2 lemon, juiced
pinch of salt
1 clove of garlic, crushed
lemon zest to taste

DIRECTIONS
Grate the zucchini on a box grater or with the fitted blade of a food processor. You can also use a spiralizer if you want long, mop-like strands which coil to make nests. Take the shredded zucchini and put it in a bowl with a sprinkle of salt. Let it stand for 10 minutes. This will begin to draw the water out. Then put it in a thin dishcloth or some cheesecloth. Squeeze out the excess moisture. You'll be surprised how much liquid you lose in this process. This keeps them from being soggy and ensures a crispy crust, like making hash browns. Return them to a medium bowl and add the egg to coat them. Add everything else except the flour and baking powder. Mix those two ingredients in a separate bowl, then add the mixture a spoonful at a time, stirring each time until you have incorporated all of it. Heat up a skillet on medium-high and warm the olive oil. Drop spoonfuls of the batter in, careful not to crowd the pan. Drizzle the tops with a little more olive oil and use a spatula to slightly smash them into patties. Cook for 3-4 minutes on either side, or until they are crispy brown. You can finish them in a 200 degree oven for another 10 minutes if you want to make sure they are cooked through and firm. I personally did not, and I thought they were perfect. Serve with your favorite accompaniments and top them with a dollop of the lemony yogurt and some zest for presentation.

ENJOY!!

Tuesday, January 27, 2015

Salmon Croquettes with Caesar + Tomato Medley


These little salmon cakes are so tasty served so many ways. You can easily substitute shrimp or tuna for an equally healthy variation. I love all three and the ingredients are virtually the same. When using canned fish, which will be the centerpiece of this dish, always choose a high quality brand because you will really taste the difference. Organic, wild - caught varieties are fish that have bred in their natural habitat as opposed to farm - raised where their reproductive cycles have been manipulated for breeding purposes. You can find low sodium varieties that are packed in olive oil or water, which will always be better for you as you can control the amount of salt. These are great for breakfast, lunch or dinner. Serve them accordingly and always with something raw for optimal digestion. For example, they go well with oven roasted potatoes and sliced avocados for breakfast, a light and flavorful salad like this for lunch or with steamed green beans, kale or spinach or squash for dinner. Quinoa, rice and millet make perfect, healthy accompaniments. You can also make these into burgers and serve them on your favorite bun with lettuce, tomato, red onion and a dijon mustard. I dressed this salad with my homemade caesar dressing. I included the recipe for that as well.

INGREDIENTS
1 six - eight ounce can of good salmon or tuna drained and flaked
( diced, cooked shrimp will also work )
1 large egg
1|2 cup gluten free bread crumbs
2 - 3 sprigs of minced green onion or thinly slice a shallot
1|4 c diced sweet red bell pepper
handful of chopped celery leaves or 1|4 diced celery ribs
fresh chopped parsley
juice of 1|2 lemon
1 T nutritional yeast
1 T dijon mustard
crushed red pepper or cayenne to taste
salt + pepper
olive oil for frying

DIRECTIONS
Mix everything into a large bowl. Adjust the bread crumbs accordingly if it seems to wet to form into patties that will hold their shape. Form into discs to fit your preference. Smaller ones are good on salads and with other vegetables but wider and thinner is best for a burger. Warm some olive oil in a saute pan on medium high heat. Fry each one about 5 - 6 minutes on each side until crisp and golden brown. Drain them on a paper towel and let them cool a minute just before serving.

ZIPPY CAESAR DRESSING
1 egg yolk
2 T of Vegenaise ( vegan mayo ) or greek yogurt for something tangy
1 T dijon mustard
1 clove of minced garlic
3 - 4 tablespoons good olive oil
2 anchovies ( optional )
pinch of cayenne 
salt + pepper to taste

METHOD
Put everything into a blender and 1 T of the olive oil. With the motor running, slowly drizzle in the olive oil which will begin to emulsify and become creamy. Add more if you want a thinner dressing, or less if you want it thick. When all of the oil is incorporated, the dressing is ready to serve and will keep in the refrigerator for about a week or so. 

ENJOY!!


Monday, January 19, 2015

Green Eggs and 'Ham'


Here's a healthy deviation to your morning scramble that will maximize the nutritional profile while minimizing calories and saturated fat, keeping you full and focused all morning long. My favorite substitution for meat ( ham in this case ) for nearly any recipe is a hearty brown mushroom. They absorb what ever you cook them with and they will develop a deep, satisfying flavor by using roasted garlic, smoked paprika and black pepper. The real trick to getting a healthy scramble is by substituting one of the yolks for a spoonful of greek yogurt and using fresh avocado and nutritional yeast in place of cheese. Adding lots of vegetables will obviously drive up the fiber and mineral content while filling you up without adding heavy animal products. One egg white contains 17 calories, while a whole egg has 70. One yolk isn't a big deal but when you omit the others, it keeps the saturated fat to a bare minimum while still giving you some good protein, which you certainly need in the morning to jump start your metabolism. I used kale but you can substitute spinach or swiss chard if you prefer.

INGREDIENTS
2 green onions, chopped, white ends omitted
5 spears asparagus, chopped leaving the tips whole
2 - 3 cremini mushrooms or a portobello, sliced
big handful of kale, stemmed and chopped
fresh jalapeno, minced ( or crushed red pepper to taste )
half of a ripe avocado
2 -3 eggs, one yolk and the rest whites
1 tablespoon plain greek yogurt ( optional )
roasted garlic powder
smoked paprika
nutritional yeast
sea salt + black pepper to taste
olive oil

DIRECTIONS
Whisk together one whole egg and 1 or 2 additional whites. Whisk in the greek yogurt and set aside. Warm a saute pan to medium and add the olive oil. Add the asparagus and the mushrooms and the jalapeno if using. Season them with salt + pepper, a sprinkle of the garlic and the paprika. Let them go for about 5 - 6 minutes. Add the kale and the green onions and 1/2 teaspoon nutritional yeast. Cover the pan for about 2 minutes just enough to steam the greens. Pour this mixture off into the bowl you will be eating out of. Return the pan to medium and add a little more olive oil or butter or ghee. Add the eggs and stir constantly until just scrambled. Season to taste and pour them on top of your vegetables. Top with fresh avocado slices and parsley.

ENJOY!

Wednesday, August 20, 2014

Chocolate Chip Cereal Bars


The new school year is in session and that means rolling out all of my favorite lunch box recipes for the kids. I have an entire chapter of my book dedicated to healthy snacks and treats that are quick and easy for road trips, picnics and play dates. This classroom favorite is loaded with healthy fats, plant based protein, fiber, antioxidants and trace minerals. Sweetened with dark chocolate and a little maple syrup, they score low on the glycemic index while keeping little bodies full of energy. 

Nuts and seeds are high in essential fatty acids which are shown to improve brain function, stimulate immune response, lower cholesterol and inhibit cancer cell reproduction just to name a few benefits. Naturally abundant in calcium, magnesium, phosphorous and potassium, these powerhouses are essential to a healthy body. They also stabilize mood and calm the nerves.

Nurturing my family from the table is my primary focus when it comes to maintaining the quality of their health. Starting from the feet up is our method. Garden to table philosophy teaches so many primary lessons about life. It allows us to share the rewards of hard work together as we learn about the importance of taking care of our bodies and nourishing them with healthy food choices. It teaches responsibility and creates awareness about the environment and the relationships between all living things. It teaches respect as a virtue. We cultivate our lives around us and it shows. Some of our best discussions are at the dinner table as we reflect on our day and all of the beautiful food in front of us that we grew together, as a family, deeply connected by the ecology.


INGREDIENTS
1 1|4 c whole oats
1|2 c diced walnuts or almonds
1|4 c chopped cashews
1|4 c chopped sunflower seeds
1|2 c maple syrup
1|2 c crisp rice cereal 
( I used a gluten free chia|flax version)
1|2 c crushed cereal flakes
1 tsp vanilla
pinch of sea salt
1|2 c almond flour
1|2 c chocolate chips or dried fruit
1 T water 

DIRECTIONS
Preheat your oven to 350 degrees. Toast the first 4 ingredients on a sheet pan lined with parchment paper for 10 minutes. Set aside to cool. Mix the remaining ingredients into a large bowl then add the cooled oats and nuts. Combine thoroughly then press it into an 8x8 inch square pan lined with parchment. Reduce the oven to 300 degrees and bake for 25 minutes. Allow the block to cool before cutting into bars or squares. These are perfect for breakfast and snacks or crumbled over fresh yogurt or with almond milk. They will keep a few days at room temperature and will remain chewy. If you want them firmer, refrigerate. You can wrap them individually in parchment paper and tie them with a string for a cute little presentation and so that they are easy to grab on the go.

ENJOY!!

Friday, August 15, 2014

Baked Avocado Eggs Diablo


Something magical happens when you combine eggs and avocado. This is so perfect for a quick breakfast when you are pressed for time. It works best with a large avocado. When you're eating something with so few ingredients, it's really worth it to buy organic. Consider the relationship between the egg and the hen. Free range, local and organic will always shine through with delicious taste and quality.

INGREDIENTS
1 large avocado 
2 small or medium eggs
sea salt + black pepper
smoked paprika
diced jalapeño or cayenne

DIRECTIONS
Preheat your oven to 425 degrees. Cut your avocado in half by running your knife around the outside in a circle from end to end. Twist the halves in opposite directions and gently pull them apart. A ripe avocado is slightly soft on the outside and does not have any air pockets between the skin and the flesh. Check the stem end for mold.
Next, take a spoon and scoop out about half of the flesh and set it aside. Use a small baking dish that will support the halves in their position so that they don't tip over during baking and spill the egg. Crack an egg in each one carefully. Try to let the yolk drop in first and then the white. Sprinkle the top with salt + pepper and paprika. Bake for 15-20 minutes until the eggs are set. Top them with hot peppers or hot sauce when they come out if you like it spicy! Serve them on top of a bed of greens dressed with a nice vinaigrette for an appetizer or accompaniment for brunch.

ENJOY!


Monday, August 11, 2014

Chocolate Hazelnut Cookies


 I have a pretty tried and true chocolate chip cookie that I've been making for ten years that is the go-to dessert in our house and everyone's favorite indulgence. It's not vegan or gluten free and that's probably why it feels so decadent. However, I have been fudging the recipe back and forth with flour substitutions and embellishments, trying to land on the perfect modification in order to achieve a healthier version that is just as popular. Gluten is something that we try to minimize as much as possible but still allow room for at times in moderation. Certainly, the nutritional profile of this cookie is far superior to the one made with flour. I used a blend of hazelnut, almond and oat flours in lieu of gluten. I prefer the texture of this one in fact, and my kids were just as happy with the result as well.


You can create high protein flour substitutes by making your own or buying them at the store. Nut flours are higher in fiber and have a natural oil content that can replace excess butter or oil in the recipe. I blended gluten free oats into a flour in my food processor. Then I did the same with whole hazelnuts. I always have almond flour on hand from making almond milk. You can read the tutorial on making almond milk and flour in this blog post here. I always use fresh, scraped vanilla bean whenever possible and of course, dark chocolate. You can use coconut oil or butter.


These are a little crispy on the outside and warm and nutty on the inside. I think they go perfectly with a fresh, almond milk latte for breakfast or a chilled glass of milk for a treat.


This almond milk latte is my favorite way to take my espresso. It tastes the very best when you make the milk while the coffee brews. The milk is room temperature and you can use the foam just like the cafes do. Don't waste the pulp! Spread it out on a sheet pan with parchment and dehydrate it to stock your pantry with healthy almond meal and flour for your next recipe!

INGREDIENTS
1|2 c oat flour + 2 T whole oats
1|2 c almond flour
1|2 c hazelnut meal
1 T flax|chia powder (optional, but recommended)
1|4 t sea salt
1|2 t baking powder
pinch of cinnamon
1|4 c melted coconut oil or grass-fed butter at room temperature
1 egg
1|2 t vanilla
1|4 c coconut sugar
1|4 c dark chocolate chips

DIRECTIONS
Preheat your oven to 375 degrees. Mix the first 7 ingredients into a medium sized bowl with a whisk. In a separate bowl, mix the coconut oil or butter with the sugar then add the egg and the vanilla until light and fluffy. A hand or stand mixer works well for this. Combine the dry and wet ingredients and fold in the chocolate chips. Drop rounded spoonfuls onto a non-stick sheet pan. You should get 10-12 out of this recipe. Bake 6-7 minutes, then rotate the pan for another 6-7. You should smell them baking and the tops become brown on the edges. Remove and let them cool 10 minutes before devouring!

ENJOY!

Monday, May 5, 2014

Strawberry Crumble Bars


I blogged this recipe last summer and used raspberries instead but you can use any combination of berries that you like, and for that matter, any fruit puree. I think apricot and peach would be so good alone or mixed with berries. This is truly a summer treat because they're frozen and are best eaten immediately with the accompaniment of a good ice cream or coconut whipped cream if you want to take it over the top. I made these for my Kombucha Home Brewing Workshop last weekend in Tulsa. Unfortunately, I couldn't keep them cold enough and they got a little gooey. The flavors were still really good, but I wanted everyone to bite into a cold, crisp bar like this. The coconut oil makes makes them creamy and rich. You will not be disappointed in this recipe - they're raw, vegan and gluten free!

INGREDIENTS
CRUST
1 cup almond meal
1|2 cup unsweetened shredded coconut
6 pitted dates or dried apricots
1|2 teaspoon coconut oil
pinch of sea salt

FILLING
6 ounces berries
3 tablespoons honey or maple syrup
1 tablespoon coconut oil
1 tablespoon fresh lemon juice

TOPPING
1|2 cup walnuts - you could substitute chopped almonds or cashews if needed
1|4 cup unsweetened shredded coconut
1 teaspoon coconut oil
1 teaspoon lemon juice
1|2 teaspoon lemon zest
pinch of sea salt

DIRECTIONS
This is a frozen bar so no need to fire up the oven in the summer! You'll just need room for a square cake pan to chill in the freezer until they're gone, which won't take long. You will also need a food processor and a sheet of parchment paper for your pan. Make the crust first by putting everything into the processor until you get a wet, crumbly meal. Add an extra couple of dried fruits if it seems a little dry. You want it to stick together when pressed between your fingers. Pour it into your pan and press it down and into the corners until it is firm and packed. Put it in the freezer while you work on the filling. No need to wash the bowl between steps. Throw in all of the filling ingredients and blend until it's mixed thoroughly like jam. After 20 minutes, pour it on top of the crust and return it to the freezer. Put the topping into the processor and pulse until it's coarse and crumbly. After another 20 minutes, pour the nut topping on and GENTLY press down into the top surface of the fruit layer. Return it to the freezer for at least an hour or up to over night. Cover the top lightly with a layer of plastic wrap. When they are fully frozen, you can cut them into perfect bars by lifting the parchment out of the pan and placing it on a cutting board. You can wrap them individually in plastic wrap or leave them in the pan with the top covered to avoid freezer burn. These are so delicious right out of the freezer, it's like an ice cream treat.

ENJOY!!

Thursday, March 27, 2014

Strawberries and Cream Scones


I've tried making scones before and they didn't turn out so great. I think you definitely have to recipe test more than once in order to find the right balance of ingredients, making modifications with flours, sweeteners and flavors. I've been experimenting with gluten free baking mixes lately and it's pretty tricky to get just the right texture. For this one, I used Bob's Red Mill all purpose gluten free flour and almond flour. The secret is adding xanthan gum. It behaves like gluten and binds and stretches, making the end result a little lighter. The almond flour is light and nutty and perfect for pastry. Plus, it tastes really good with the strawberries. The cream is coconut milk but you could use almond milk. These were originally vegan but I used butter. You could use cold coconut oil or a vegan butter if you wanted. I served these for a ladies brunch I hosted at my place. I also made fresh almond milk that morning which was so delicious as an addition to coffee and tea. You can read my post on making your own almond milk and almond flour here plus links to earlier posts with recipes that showcase it.

INGREDIENTS
1 cup Bob's Red Mill gluten free all purpose flour
3|4 cup homemade almond flour
1|2 teaspoon xanthan gum
1|2 cup coconut sugar
2 teaspoons baking powder
1|2 teaspoon baking soda
1|2 teaspoon sea salt
splash of vanilla
5 tablespoons cold butter
1|2 cup coconut milk or almond milk
1 cup diced strawberries

DIRECTIONS
Sift the dry ingredients together and cut in the cold butter using a pastry knife or pulse in a food processor. Mix in the vanilla and the milk. Fold in the strawberries. Spread a sheet of plastic wrap out on the counter and dust it with a little flour. Press the dough into a 12 inch circle and cut into 8 wedges.
Line a baking sheet with parchment paper and bake for 16-18 minutes at 400 degrees. Rotate the pan halfway through the cook time. Cool on a wire rack.

ENJOY!

Friday, March 7, 2014

Spring Vegetable Omelette with Fresh Mozzarella


The word omelette is kind of traditional and this recipe is far from that. Typically, you layer the ingredients inside the egg and fold it over to make a half moon but I don't really stick to a method. It's really more like a hard scramble. The secret is not to overwork the eggs because they will start to fall apart. Moving them across the pan in large sheets keeps them firm and in larger pieces. I also served my cheese on the side in fresh wedges instead of melting it on top, cafe style. I love eating food that's in season. It's always going to be the freshest in the markets and of course, if you are growing it yourself. This is a good way to incorporate lots of greens into your breakfast. I have so many varieties in my winter garden right now that I eat a combination of them with every meal. I prefer a 2:1 ratio of whites to yolks, so I separated a couple of mine. You can use whole eggs if you prefer. Take a little walk through my winter garden of greens with me on the way to the recipe....


This beautiful, blue kale is my all - star. It performs better than any other cool weather green. It's strong, hardy and vigorous! I keep it pinched back all winter long, eating the larger leaves first. The baby leaves are sweet and tender enough for salad. 


This mesclun mix of lettuces are the glamour girls of the greens. Lacy, pointed and dotted with dark red, they are super delicate and perfect eaten immediately picked and always raw.


Spinach is second in line for hardiness. It hardly blinks under snow and freezing temperatures when protected. Keep the leaves pinched once a week and you will have it until May. It's delicious cooked or raw. I use it both ways all the time because it's so versatile.


This intermix of mache and chervil are really pretty together. Mache has a very green flavor and tastes best mingled with other lettuces. Chervil has a distinct anise flavor and is complimentary with fish, lemon and vinegars.


INGREDIENTS
Fresh, organic eggs - 2 per person, either separated or whole, whisked
asparagus, tough ends trimmed, diced
cherry or grape tomates, halved or quartered
shallot or red onion, thinly sliced
fresh garlic, minced
baby kale or spinach, cut into ribbons
fresh jalapenos, sliced (optional of course)
other optional ingredients could be sliced mushrooms, zucchini or bell pepper
parsley, chopped
fresh water mozzarella, cut into triangles or medallions
olive oil + butter or ghee
sea salt + black pepper

DIRECTIONS
Warm a saute pan on medium and add the olive oil. Add all of the vegetables except the tomatoes, greens and parsley. Season with a little salt. Cook about 2 minutes. Add about a tablespoon of butter or ghee and the tomatoes, greens and parsley. Season with black pepper. Add the eggs. Using a flexible spatula, move the eggs across the pan in sheets, careful to keep them firm and in large pieces. Adjust the salt + pepper. Cook until they have just set. Serve on a nice plate, arranging the wedges of mozzarella around one side and garnish with any reserved parsley and black pepper.

ENJOY!

Tuesday, February 25, 2014

Chocolate Chip Cereal Bars

I posted an earlier version of these bars here a few months ago that were very good but totally different in texture and taste. The basic recipe is the same, using oats, nuts and a natural sweetener but obviously there are a multitude of options when it comes to just those things. The former version was halfway between a crunchy and chewy bar like a rice crispy treat. These were much softer like a true cereal bar and my kids now prefer them over the others. Wrapped individually and kept in the refrigerator, they are such a winner when it comes to quick and delicious. My fourth grader took one in his lunch everyday until they were gone!


 Toasting the oats and the nuts brings out a delicious, buttery flavor that is a must when making these.


I used whatever random cereals I had on hand, plus finely shredded coconut, oat flour and flax | chia powder. This stuff acts like flour and binds it all together. Just pulse the cereal flakes in the food processor until they are coarsely ground.


The uncut brick is so pretty in this natural light. You can just lift the parchment paper right out of the baking dish and set it on a cooling rack until it's ready to cut.


This recipe makes 8 rectangular bars in an 8 x 8 square baking dish, or you can cut them in half for a smaller treat. I used rich, dark chocolate chips and they were incredible!

INGREDIENTS
1 1|4 c gluten free rolled oats
1|2 c diced walnuts or slivered almonds
1|4 c chopped cashews
1|4 c unsalted sunflower seeds
1|2 c maple syrup + 2 tablespoons raw honey
1|2 c chocolate rice crisp cereal
1|2 c heritage flakes
1 tablespoon water
1 teaspoon vanilla
1|4 teaspoon sea salt
a big pinch of good cinnamon
1|4 c oat flour
2 tablespoons finely shredded coconut
2 tablespoons flax | chia powder
1 c dried fruit , dark chocolate chips or cacao nibs

*A note on ingredients: modify this recipe as needed using what you have on hand or whatever you prefer if there is something you don't like. The same goes for the cereals. The important part is that you use 1 c of crunchy cereal and 1 cup of nuts. Just get the ratios right and really, this recipe is pretty flexible. The sweetener can be entirely honey or brown rice syrup, if that's what you have. It will change the consistency a little though, as those sweeteners will make a tackier bar instead of something soft.

DIRECTIONS
Preheat your oven to 350. Pour the oats and the nuts onto a sheet pan and lightly toast for about 10 minutes, stirring halfway through the cooking time. Remove and allow the pan to cool before mixing everything together. Drop the heat down to 300. Put the crunchy cereals into a food processor and pulse until it's crumbly and a little coarser than flour. In a large bowl, mix the remaining ingredients together, add the cereals, and stir in the oats and the nuts you toasted. Line a square baking dish with parchment paper. Press your mixture into the corners and flatten it on top. Bake for about 23 - 25 minutes until it's slightly brown on top and fragrant. You can let it cool in the baking dish, or you can gently lift the sides of the parchment out and set the entire thing on a wire cooling rack. It will cool much faster this way. Wait at least 20 minutes before you cut into them. Wrap individual bars in parchment and tie with string for a nice presentation or wrap in plastic wrap and store in the refrigerator for a firmer bar or at room temperature for something a little soft and crumbly.

ENJOY!!

Thursday, February 6, 2014

Almond Coconut Mini Muffins with Raw Cacao

Almond flour is perfect for pastries, desserts and crusts. I've posted about using it numerous times and I pretty much always have it on hand from making almond milk. It's available in most grocery stores, and certainly in all health food stores but it's always cheaper and fresher to make it yourself. This was originally a recipe for cookies but I put them into these silicone mini cups instead because they were snacks for my son's classroom and these looked more fun. If you want to make the cookies, just drop the dough onto a non - stick sheet pan or one lined with parchment paper.


I collect vintage tea towels, tablecloths and dinner napkins. I love this fifties cake pattern. Doing something really simple when you serve your family and guests makes all the difference. We really do eat with our eyes first. Make your daily food rituals a thing of beauty.


You can find silicone muffin cups at kitchen stores, gourmet or specialty stores, some department stores, Bed Bath + Beyond etc. They come in sets of 12 and do not require non - stick spray. After baking, they just peel off and are really easy to clean by hand.


INGREDIENTS
1 1|4 cups almond meal
1|4 cacao nibs or dark chocolate chips
1|2 cup shredded coconut
1|2 teaspoon baking powder
1|4 teaspoon sea salt
1|3 cup coconut sugar (turbinado, brown and muscovado also work)
1 egg
3 tablespoons coconut oil
1|2 teaspoon vanilla

DIRECTIONS
Preheat your oven to 375. In large mixing bowl, stir together the almond meal, cacao nibs, coconut, baking powder, salt + sugar. In another bowl, beat the egg until it has doubled in size. Whisk in the warm coconut oil and the vanilla. Add this to the dry mixture and bring it together until just combined. Pop the bowl into the refrigerator to chill for about 30 minutes or cover and leave it overnight. Using clean hands, roll the chilled dough into balls about an inch in diameter and place on a baking sheet to make cookies. Give them a gentle press on top to flatten slightly. If you're making the muffins, drop the dough into non-stick cups or a tin lined with paper sprayed with cooking spray. Bake 7 to 10 minutes until the edges begin to brown or until a toothpick inserted into the muffin cups comes out clean. Let them cool slightly before serving with a warm coffee, tea or an ice cold glass of homemade almond milk!

ENJOY!

Tuesday, July 9, 2013

Superfood French Toast

This is another awesome way to more than double the nutritional content of what normally is a very basic breakfast or brunch. It's a simple French Toast with a bunch of super accessories. Remember my earlier post about doing a similar thing to a plain waffle? Using good quality ingredients really makes a huge difference in something that has little value to something that is very good for you. We like sprouted bread around here but you can use any whole grain bread that you like. Sprouted bread is generally gluten-free and sprouted grains are always superior to the non because your body can digest them much easier. Use a farmer's fresh egg, your own or an organic one. I've used mashed up banana in this one but I've also made the same thing with sweet potato puree. It's like a sweet potato pancake. I paired it with fresh picked berries from my organic garden which always tastes like the success of love and labor. This breakfast has 10 grams of protein, less than 300 calories and is packed with plant based fiber, antioxidants, amino acids, omegas, lignans, essential nutrients + minerals, immune stimulants, probiotics and beneficial bacteria that soothe the digestive system.


INGREDIENTS
Whole grain, sprouted bread
coconut oil for the pan
1 egg
2 tablespoons coconut milk or plain coconut creamer
vanilla
cinnamon
bee pollen
chia + flax powder
almond meal
1|2 banana, mashed
pinch of salt
fresh berries
plain, greek yogurt
chopped walnuts or pecans

DIRECTIONS
Mix everything from the egg to the banana into a wide bowl suitable for dredging. Adjust the coconut milk if the batter seems too thick. I don't usually give exact amounts in recipes like this because you can just add a pinch of everything and it always turns out right. It is not an exact science and anyone can do it. Warm the coconut oil in a non-stick pan. Dredge your bread through the batter and cook it about 2-3 minutes on each side. I always know it's time to flip when I can smell the cinnamon. Top your toast with the yogurt, berries and nuts. This is about as close to a healthy doughnut as it gets, people. It tastes like sin, it's so good. Every ingredient serves your body's higher purpose. This recipe makes 2 or 3 pieces.

ENJOY!

Friday, May 10, 2013

Accessorize Your Food


You can take a simple breakfast and more than double it's nutritional value by adding the right accessories. Let's face it - who doesn't like beautiful food? The art of dressing a plate is something that is often overlooked and underrated. I think that when we take the time (a few extra minutes at most) to create something that is healthy and beautiful to look at, it not only gives us pride in what we are feeding ourselves and our families, but it forces us to be CONSCIOUS about it. It allows us to develop a true relationship, complete with dialogue, with the most important ritual of the day. For example, not everyone has the time or the right ingredients to make something entirely from scratch for every meal. So when you are shopping for your convenient foods, it is important to choose products that are still quick but don't tank on nutrition. You can stock your dry and refrigerated pantries with super food accessories that can ramp up the nutrition by more than half when you add them to your dish. I always keep things like bee pollen, chia seed, flax seed, walnuts, almonds, coconut, nutritional yeast and green powders on hand for exactly this reason. In fact, when you use the right combinations with fresh fruit or vegetables, the accessories themselves can have more nutrition than the base for your meal. 


This was a frozen, organic buckwheat waffle. I added plain greek yogurt for my dressing and topped it with strawberries, walnuts, chia seed, bee pollen, shaved coconut, flax seed and tangelo slices. It was incredible!

  • CHIA seed is an energizer that has been used since the American Indians were on desert marches and runs. They would sustain long days with it. You can achieve stamina by roasting and grinding a handful before you exercise or do physical activity. Second to flax seed, it is highest in Omega 3 fatty acids.
  • FLAX seed is a decongestant, demulcent, emollient, expectorant, laxative and purgative. It works directly on the digestive tract. They are also energizers. They can relieve asthma, chronic cough, enrich the blood and strengthen nerves. It contains all 8 essential amino acids.
  • WALNUTS strengthen the kidneys and lungs and lubricate the large intestine. Astringent and antiseptic, they can address athlete's foot, ringworm and impetigo. They regulate blood sugar and improve metabolism.
  • COCONUT contains organic iodine that assists with thyroid function and soothes internal membranes. The water contains the highest, naturally occurring amount of electrolytes known. It is identical to human plasma, making up 55 percent of our blood.
  • YOGURT is a known pro-biotic and contains millions of beneficial living bacteria that assist our digestive tracts. It is high in protein and organisms that keep our gut happy. The plain variety treats candida overgrowth and is low in sugar, which is optimal.
  • BERRIES are the powerhouses of the fruit family containing large quantities of vitamin C, retinols, and easily digestible fiber that requires little energy from the body as they are almost immediately assimilated. They are astringent and laxative. They clean the blood and the skin.
  • BEE POLLEN is always best when consumed locally. It aligns the immune system with the local pollen and allergens and helps create a resistance to foreign particles. It is incredibly antibiotic, anabolic, antifatigue, anti-infective, diuretic, nervine, stimulates immune response and is certainly one of the most essential items you should have in your pantry.