Showing posts with label dinner. Show all posts
Thursday, March 28, 2019
Perfectly Traditional Falafel + Tzatziki
I've been making falafel for years, and recently, I figured out I'd been doing it all wrong. I've embellished it, made it with canned chickpeas, added various flours and baking enhancers in order to pan fry it and finish it in the oven trying to make it healthier, la ti da. None of that works.
I recently read a scientific article about it and my head split open. Food science is so basic and molecular. It makes much more sense when simplified, and explained. So this post isn't really about the best falafel recipe, which only has three ingredients. This is more of an expansion on what I read and how it can be applied to making them perfect every single time.
Without any unnecessary, long-winded explanations, this is simply an issue of starch. This is why using canned chickpeas NEVER works. Because they have previously been cooked, all of the necessary starches contained in the chickpeas has been cooked out. That is the crucial ingredient that binds them together, giving you the perfect inside texture that is not doughy or resembling something more like a dumpling. Using soaked chickpeas is pure magic. By soaking them for 24 hours, they are allowed to soften and slightly sprout, making the nutrients more bio-available and easier to digest, plus adding some moisture which will allow them to steam as they cook. The temperature of the oil is also hot enough to fully cook the mostly raw chickpeas.
The method involves a food processor and the right size pot for a medium-deep fry. Using a medium sized dutch oven works really well but it needs to be heavy bottomed so that you can control the temperature of the oil and so that they don't burn as they fry. I used my Le Creuset 2.75 quart dutch oven, which is enamel coated cast iron. It was awesome for this method. The high walls reduced any splatter - no mess! This was halfway between a pan fry and a deep fry. The oil went about halfway up the sides of the falafel which were about golf ball size and then flattened slightly to create flat sides that would make good contact with the bottom of the pan, meaning you only flip them once.
These take about 3-4 minutes on each side so you need to stay with them and not walk away, as they can burn easily if overdone. The oil should be in the 350 degree range. Test a small amount of batter to see that it's ready or use a candy thermometer to accurately gauge it. Use a high heat oil such as avocado oil. It's a healthy fat and is much better than canola or vegetable. You could also use a neutral coconut oil. Drain and blot on paper towels. They will be crispy on the outside and warm and soft on the inside - not mushy or doughy. Really good and best consumed immediately! I've included a basic recipe for the batter. My simple spelt tortilla/flatbread/pita recipe works very wells as a wrap, especially if you are gluten-sensitive. You can find that using the search tool on my blog as well.
HERBED FALAFEL
Makes 9-12 ( Depending on size )
1 cup organic, rinsed chickpeas, soaked 24 hours
1.5 - 2 cups packed herbs of parsley, cilantro, mint and chopped scallions
2 t each cumin and coriander
salt to taste - a big pinch
METHOD
Blend everything in a food processor until well combined. You will need to blend and scrape the sides a few times to do this. Form into golf ball sized portions and roll into balls then slightly flatten. I used a cookie scoop to make them all the same size. Awesome tool for so many things!
Heat oil to 350-360 degrees and gently lower into the oil for 3-4 minutes on each side. Drain on paper towels top and bottom. Serve with pita or your favorite tortillas, on greens with olives, tomatoes, pickles, red onions, feta and tzatziki.
ENJOY!!
Wednesday, September 12, 2018
Paleo Fusion Tostadas
In an effort to reduce my intake of grains, I've been experimenting with recreating some dietary staples such as bread, tortillas, baked things and various crusts. These tostada shells are made from almond flour which give them a crispy, pastry quality that is something between a pie crust and a flatbread. I've been reading the book Grain Brain, which is an interesting and informative perspective on those deeply affected by the spectrum of grain-gluten sensitivity and intolerance. I've also been deeply diving into the personal story and cookbook Against All Grain, which also offers more perspective on the effects of our GMO crops and they have affected our evolving biology. I am personally not on either end of the spectrum with regard to my own body's digestive process, but somewhere in the middle. If you are exploring these topics, I highly recommend checking out both books.
This recipe uses blanched almond flour, fresh lime juice + cilantro. They are baked, not pan-fried which keeps them light and crisp. I'll include various substitutions for the ingredients that work just as well so that you can play around with them and find the one that is best for you, whether that is vegan or purely paleo.
INGREDIENTS
2.5 c blanched almond flour, or a combination of your choice nut flour + GF oat flour
1 t sea salt
1|2 t baking soda
2 T olive oil, or coconut oil
2 large eggs, or equal parts flax egg ( 1 T flaxseed meal + 2.5 T water per egg)
2 t chopped cilantro, or herbs of choice to fit your recipe for toppings
1 t lime juice, or lemon or orange or even apple cider vinegar
METHOD
Preheat oven to 350 degrees. Line a baking sheet with parchment paper. Mix all ingredients together in a bowl or food processor until a dough forms. Portion into 6-8 balls and roll between your hands until smooth. If you have a tortilla press, this works really well for these by pressing each ball between two pieces of parchment paper until about 1|8 inch thick. This can also be done by using a rolling pin, still keeping each one between parchment and rolling out to about 6 inches wide. Transfer each one gently to the sheet pan and bake for 18 minutes, flipping each one and rotating the pan halfway through at about 9 minutes. Transfer to a cooling rack to ensure crispiness.
As always, there are many optional embellishments for ways to build a tostada. The ones pictured here are loaded with a black bean puree, shredded greens + cilantro, chopped pickled jalapeƱos + carrots, my pickled red onions, shredded chicken, labne (or greek yogurt or sour cream), avocado and chili powder.
ENJOY!
Thursday, March 22, 2018
Loaded Sweet Potato Nachos
I hope it doesn't seem like I start every blog post with how this is the best dish ever and you totally have to make this. Although, that's the point in writing a food blog isn't it? And I totally stand by the quality of my food. Not everything works the first time, and not everything makes the cut for the online recipe box. But seriously, these nachos are the bomb and there is no cheese! They are gluten free and easily made vegan by omitting one ingredient, which I'll make a note about in the recipe. The only thing you can't see from these photos is that there is a tasty layer of black bean mash on the potatoes and underneath all of the veggies. It's the glue that makes everything stick together, in place of a ton of cheese. I put nutritional yeast in the beans so it totally gives you that flavor. If you are a purist and really want a truly crispy nacho, you can blanch and fry your sweet potatoes or use sweet potato chips. HOWEVER, these are the most delicious oven baked sweet potato chips you'll make, and of course they're healthy!
INGREDIENTS
1 large sweet potato, cut into slices or half moons
1 cup cooked black beans or 1 can prepared
1 tomato, cut to preference
1 avocado, chopped
green onion, sliced
napa cabbage, finely shredded
any kind of sprouts you like - I used radish
cilantro - substitute parsley if you prefer
lime
chili powder
crushed red pepper flakes
cumin
nutritional yeast
neutral vegetable oil - I used sunflower
onion + garlic granules
salt + pepper
creamy dressing or greek yogurt
METHOD
Preheat your oven to 400 degrees. Toss the sweet potatoes in oil, salt, pepper, onion + garlic, crushed red pepper + nutritional yeast. Bake for 15 minutes, then flip and bake another 10-15 minutes until forming a crust. While these are baking, prepare everything else. Put the beans into a medium skillet with a little oil + water to get the right consistency. Season them with salt, pepper, chili powder and nutritional yeast. Mash about half of them with a fork as they cook in the pan. When the potatoes come out, assemble onto a plate or serving platter single layer, putting any extra on top, staggered. Drizzle with a creamy dressing or greek yogurt. Put a layer of the beans on next. Then the cabbage - squeeze some lime juice onto it. Then tomatoes, avocado, cilantro, green or red onion. Top with sprouts and hot sauce or chili powder. You're all set!
ENJOY!
Wednesday, November 29, 2017
Zucchini Croquettes with Turmeric Spiced Chickpeas + Tzatziki
This is one of my favorite recipes and I find myself coming back to it all the time with little tweaks and modifications on the original to fit what I happen to be in the mood for. Sometimes I put them on pita and eat them like felafel and sometimes I want them as a savory side to a soup or salad. This time, I was really craving a little of all of that. I made the traditional mint tzatziki and added lemon zest, more fresh herbs and these AMAZING turmeric spiced chickpeas for added protein and heat. Your optimal choice would be to sprout the chickpeas overnight, but using a can of rinsed peas works just as well and certainly expedites this as a quick lunch. I usually make the batter for the croquettes ahead of time and keep it in the refrigerator so that I can just scoop out individual portions and make them right on the spot. They take minutes in the skillet. You can also bake them on a sheet pan at 375 ahead of time and freeze them for later. They are easily reheated in the oven. So versatile!
INGREDIENTS
CROQUETTES
1 medium to large zucchini, grated
1 large leek, thinly sliced (white and light green parts only - save the dark green tops for stock!)
2 cloves of garlic, minced
4 - 5 medium cremini mushrooms, diced
1|2 cup arborio rice
1 cup vegetable or chicken stock, warmed
1 egg (substitute a flax egg for vegan - 1 T flax meal soaked in 3 T water)
1|4 cup flour ( I used oat flour - gluten free works great)
1|4 tsp baking powder
1 - 2 T nutritional yeast
freshly chopped parsley
sea salt + black pepper to taste
olive oil
--> Put the zucchini into a thin dish towel and squeeze out all of the water. Set aside. Cook the arborio rice like risotto. Add the rice to a dry skillet and toast for 2 minutes on medium heat. Gradually add the warm stock one half cup at a time, stirring until it has been absorbed until all of the stock has been added and the rice is tender and a little sticky. Remove it to a mixing bowl and set aside. Warm some more olive oil in the same skillet and add the leeks, mushrooms and garlic, cooking until tender. Add the vegetables and the zucchini to the cooled rice and season with salt and pepper. Mix the dry ingredients together and add the rice mixture until a sticky, doughy batter comes together that can be formed into patties. Chill for about 20 minutes while you make the chickpeas and the tzatziki.
SPICED CHICKPEAS
1 cup cooked chickpeas, drained and rinsed if using canned
turmeric powder
cumin powder
paprika powder
garlic powder
sea salt + black pepper to taste
olive oil
fresh chopped cilantro
--> Warm 1 T olive oil on medium in a skillet. Add the chickpeas and spices and cook until they become slightly crispy and very fragrant. Season with salt + pepper and garnish with cilantro. Set aside.
TZATZIKI
1 cup plain, Greek yogurt (substitute coconut yogurt for vegan)
1|4 cup cucumber, peeled and grated
1 - 2 T fresh lemon juice, peel reserved for zest
fresh chopped mint
sea salt to taste
--> Mix all ingredients together in a small bowl and refrigerate while you assemble the croquettes.
Form the croquettes into small patties, pressing down slightly and cook in olive oil until golden on each side, about 2 - 3 minutes. Serve immediately or freeze for later.
Try them on mixed greens with seasoned, sliced tomatoes. Add the chickpeas and top the croquettes with the yogurt sauce and garnish with extra mint and lemon zest. These are also good in pita bread or served with the yogurt and a soup or even tabouli.
ENJOY!
Wednesday, September 27, 2017
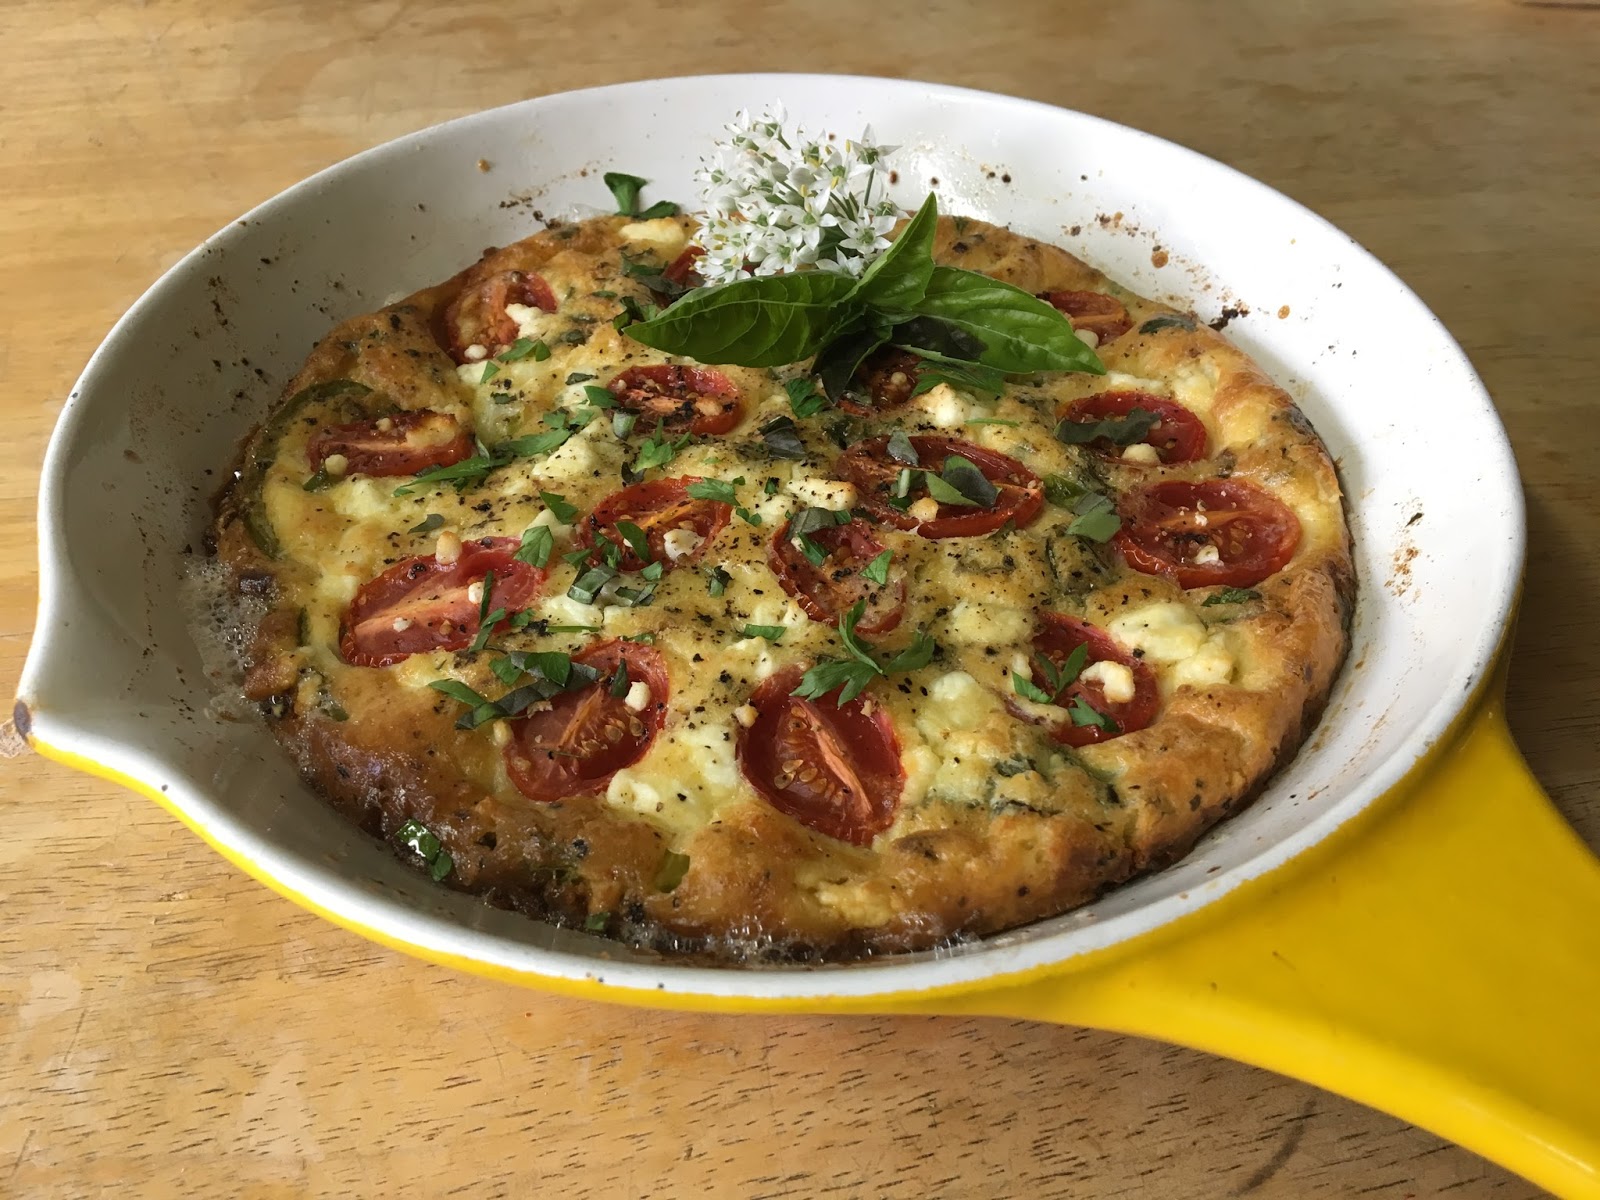
The Anytime Frittata
I might otherwise call this the end of summer frittata, but we just rolled over into fall officially. I'm still using up the slowly fading harvest of the heat as the tomatoes, peppers and basil have hit their peaks and appear to be ready for retirement. I'll be making a ton of pesto to freeze, pickling an assortment of peppers for the pantry and stewing some tomatoes with garlic chives for those tasty pastas, lasagnas, manicottis, pizzas and calzones. How wonderful it is to be able to savor the flavor of summer well into the winter when we get snowed in, become wracked with cabin fever and are left to spend our time hovering around the oven and stove, creating delicious things to eat. Preserving, pickling, canning, freezing and fermenting are incredible ways to extend the life of your garden and get creative with sustainable practices that not only bring us tasty joy, but reduce our kitchen cook print.
Frittatas are about the easiest, one - pan dishes you can make that is suitable any time of the day. I take the opportunity to clean out the crisper and use any excess produce on hand. The combinations of ingredients are limitless and I've found one that nearly suits everyone in my family. The only tools you need are a cast iron skillet and a wooden spoon. I like using my enamel coated one because the egg doesn't stick so badly to it as it does the raw iron. Both will work, but one is tougher to clean. Furthermore, choose the one that is the right size according to how many you want to serve. This is an 8 inch pan and made four lovely servings. Pair it with a fresh salad and you have a perfect plate.
INGREDIENTS
For a basic frittata, make a base of eggs and a little milk or cream. This is basically a crustless quiche. The ratio of 2 - 3 eggs to about 1|4 cup of milk works well and will give you a nice custard.
For this variety, I used these other optional embellishments.
5 - 6 spears asparagus, ends trimmed, stalks chopped, tips reserved
1|4 c red onion, diced
5 - 6 cremini mushrooms, medium to large, thick sliced
2 cloves garlic, minced
1|2 bell pepper, any variety, chopped
5 - 6 large cherry tomatoes or grape tomatoes, halved
crumbled goat cheese
fresh parsley, basil, garlic chives
nutritional yeast
grass - fed butter + good olive oil
salt + pepper + crushed red (or diced jalapeƱo)
DIRECTIONS
Preheat your oven to 375 degrees. Warm your pan on medium high and gently warm the olive oil until it glimmers. SautƩ the onion and bell pepper for about 5 minutes until softened. Add the garlic, mushrooms and asparagus stems. Season everything with salt + pepper + crushed red until just right for your taste. Add 1 -2 tablespoons of butter, the fresh herbs (reserving a little for garnish), nutritional yeast (a few shakes or a palmful) and mix everything together well. Turn off the heat. Mix your eggs and milk together in a bowl and pour right over the vegetables. Arrange the asparagus spears on top with the tomatoes. Crumble the goat cheese all over and bake until golden brown around the edges and little bubbles begin to form and brown across the top, about 30 minutes for this size pan. Up to 40 - 45 for a ten inch or larger. Check the center with a toothpick. It should not be wet and should be firm in the middle if gently pressed with your finger. Serve with a side salad and a basic vinaigrette and some crusty french bread, if desired. It's good for mopping up your plate!
ENJOY!
Wednesday, August 30, 2017
Warrior Chicken Salad
With regard for salads as entrees, whether that's a lunch or a dinner, add this one to your home recipe box for a 30 minute go - to dish that is not only extremely simple but has an amazing amount of protein which is primarily plant based. I added some some super thin, well - seasoned chicken, but that is clearly optional to make it vegetarian. Leave off the feta and it's vegan. It's already gluten free. The base is sprouted quinoa and chickpeas. It has all the fresh flavor of a tabouli with tomatoes, cucumbers, red onion, parsley, lemon and good olive oil. I added hemp hearts for a little extra boost and tossed it all in a bright vinaigrette. It can totally be made a day ahead and stored in the refrigerator. It is best if left to sit for about an hour to let the flavors develop while you prepare the chicken or any other main course to pair it with.
INGREDIENTS
1|2 cup sprouted quinoa
1 cup cooked chickpeas, or 1 can drained + rinsed
1 cup vegetable stock
1 cucumber peeled + deseeded + chopped
1|2 pint cherry tomatoes, halved
1|4 - 1|2 red onion, shaved thin
2 T raw hemp hearts
3 - 4 chopped pepperoncini peppers, stemmed + seeded
1|4 c chopped parsley
1|4 c chopped mint
1 t dried oregano
salt + pepper + crushed red to personal taste
sprinkle of granulated or powdered garlic
2 T good quality olive oil
1 - 2 T red wine vinegar
juice of 1 medium lemon, seeds removed
drizzle of honey
feta cheese for garnish
*optional chicken breasts, butterflied + pounded thin
season chicken with salt + pepper + dried oregano on both sides
METHOD
Mix everything except the seasonings and acids together into a medium mixing bowl. Add half of the olive oil, lemon, vinegar, honey, oregano, salt + peppers. Set aside. Butterfly the chicken breast on your cutting board, cover with plastic wrap and pound very thin with a tenderizing mallet. Warm the rest of the olive oil in a large skillet and brown the chicken on both sides, about 4 minutes. Let it rest for 5 minutes, then slice thin and fan it over the top. Garnish with additional parsley and crumbled feta cheese.
ENJOY!!
Friday, August 28, 2015
Crispy Zucchini Fritters
Here's one of those winner recipes that is so versatile, it can be eaten and served any time of the day. The addition of the tangy, lemony yogurt makes it a perfect snack or meal, along with a nice piece of fish or chicken and a fresh tomato salad or eggs. There is always room to make anything vegan or gluten free with a some basic substitutions, which make the best recipes, in my opinion. They are easily made ahead of time, refrigerated and reheated or frozen and baked. I adapted this recipe from the Smitten Kitchen and then modified it a little, as usual. You can also substitute potatoes for part or all of the zucchini and add other things like kale, mushrooms or onions. Serve them as an appetizer on a bed of wilted greens and thin out the yogurt into a dressing by adding extra lemon juice or a little vinegar. Warm and satisfying, these fritters will have you doubling the recipe in no time just so you can eat one more!
INGREDIENTS
1 medium zucchini, ends trimmed
4-5 mushrooms, sliced thin
2 scallions, finely minced
1 egg or vegan egg substitute
1|2 cup flour, all-purpose or gluten free
1|2 t baking powder
sea salt + pepper
crushed red pepper or cayenne to taste
pinch of garlic powder
1|2 t nutritional yeast
olive oil
LEMONY YOGURT
1|2 cup greek yogurt or coconut yogurt
1|2 lemon, juiced
pinch of salt
1 clove of garlic, crushed
lemon zest to taste
DIRECTIONS
Grate the zucchini on a box grater or with the fitted blade of a food processor. You can also use a spiralizer if you want long, mop-like strands which coil to make nests. Take the shredded zucchini and put it in a bowl with a sprinkle of salt. Let it stand for 10 minutes. This will begin to draw the water out. Then put it in a thin dishcloth or some cheesecloth. Squeeze out the excess moisture. You'll be surprised how much liquid you lose in this process. This keeps them from being soggy and ensures a crispy crust, like making hash browns. Return them to a medium bowl and add the egg to coat them. Add everything else except the flour and baking powder. Mix those two ingredients in a separate bowl, then add the mixture a spoonful at a time, stirring each time until you have incorporated all of it. Heat up a skillet on medium-high and warm the olive oil. Drop spoonfuls of the batter in, careful not to crowd the pan. Drizzle the tops with a little more olive oil and use a spatula to slightly smash them into patties. Cook for 3-4 minutes on either side, or until they are crispy brown. You can finish them in a 200 degree oven for another 10 minutes if you want to make sure they are cooked through and firm. I personally did not, and I thought they were perfect. Serve with your favorite accompaniments and top them with a dollop of the lemony yogurt and some zest for presentation.
ENJOY!!
Thursday, April 16, 2015
Curried Acorn Squash Soup with Toasted Chickpeas
The best recipes are usually the most simple. You can take a little extra time making some special garnishes that will make a basic soup seem pretty fancy. This recipe has room for many optional embellishments. I think my favorite herb is cilantro and I find myself creating dishes around it just so that I have really good excuse to eat it. I know that it offends some people because of it's particular flavor, so feel free to substitute fresh parsley instead.
However, the primary function of cilantro is to rid the body of heavy metals, which can be absorbed by consuming foods that are packaged in cans, from products we use and from the basic exposure to it. It mobilizes mercury from it's storage containers in the body, which is adipose or fat tissues. It can move it quickly from the brain and central nervous system. Combined with algae, which binds to the excreted toxin, this combination is extremely efficient at working together. Just some quick facts about this delectable herb and it's powers.
Now that we are heading toward warmer weather, I will be growing my own squashes and looking forward to mixing up my recipes with them. Try making this delicious soup - it's very easy and takes about an hour, start to finish. Most of that time is the slow cooking and doesn't require a lot of fuss.
This can easily be made vegan by omitting the yogurt drizzle on top, but it's totally worth it!
INGREDIENTS
1 large acorn squash, halved and seeded
1 medium yellow onion, chopped
3 stalks of celery, minced
4 cloves of garlic, minced
2 cups vegetable broth or chicken stock
1 cup coconut milk
1 tablespoon curry powder
olive oil
salt + pepper
cayenne
OPTIONAL GARNISHES
fresh chopped cilantro or parsley
1 cup of cooked chickpeas or toasted cashews
greek yogurt
sauteed mushrooms
green onions
smoked paprika
DIRECTIONS
Preheat your oven to 400 degrees. Take each half of squash and rub it down with a drizzle of olive oil and season with salt + pepper. Put them face down on a baking sheet and cook them for about 35 minutes or until the tip of a knife can pierce the outside easily. While the squash bake, start a saute in a medium to large sized soup pot. Warm about a tablespoon of olive oil and add the onion and the celery. Season with a pinch of salt + pepper. Let them go about 10 minutes until they begin to brown slightly. Add the garlic, curry powder and cayenne and cook just until it becomes fragrant. De-glaze your pot with your stock liquid by pouring in about a half cup at first, then add the rest. Add the coconut milk and adjust the salt. When the squash is done, remove it from the oven and let it cool about five minutes. Using a spoon, scrape each half down to the skin and add this to the soup. You can blend the soup right in the pot by removing it from the burner and using an immersion blender. This is a tool that is totally worth the investment. If you don't have one, you can use a blender but you will need to allow it to cool down a bit first.
In the meantime, you can toast your nuts or make crunchy, spiced chickpeas in the oven that's probably still warm. Bring it down to 375 degrees. Toss the chickpeas in a bowl with olive oil, salt + pepper and smoked paprika. Spread them out single layer on your same baking sheet and pop them in for about 20 minutes, giving them a shake halfway through. After they cool, they will be crunchy and crispy like nuts. So delicious.
If you have a squeeze bottle fitted with a small tip for dressings or sauces, use this to make your fancy zig zag. Fill it with a couple tablespoons of plain, greek yogurt and a splash of water. Shake it up and you've got a great little tool for finishing touches. Dress your bowl with sauteed mushrooms if you're using them, and top it with fresh herbs and nuts. Add your design last. You will love this versatile soup that can be made just as easily with a butternut squash or even sweet potato.
ENJOY!!
Tuesday, January 27, 2015
Salmon Croquettes with Caesar + Tomato Medley
These little salmon cakes are so tasty served so many ways. You can easily substitute shrimp or tuna for an equally healthy variation. I love all three and the ingredients are virtually the same. When using canned fish, which will be the centerpiece of this dish, always choose a high quality brand because you will really taste the difference. Organic, wild - caught varieties are fish that have bred in their natural habitat as opposed to farm - raised where their reproductive cycles have been manipulated for breeding purposes. You can find low sodium varieties that are packed in olive oil or water, which will always be better for you as you can control the amount of salt. These are great for breakfast, lunch or dinner. Serve them accordingly and always with something raw for optimal digestion. For example, they go well with oven roasted potatoes and sliced avocados for breakfast, a light and flavorful salad like this for lunch or with steamed green beans, kale or spinach or squash for dinner. Quinoa, rice and millet make perfect, healthy accompaniments. You can also make these into burgers and serve them on your favorite bun with lettuce, tomato, red onion and a dijon mustard. I dressed this salad with my homemade caesar dressing. I included the recipe for that as well.
INGREDIENTS
1 six - eight ounce can of good salmon or tuna drained and flaked
( diced, cooked shrimp will also work )
1 large egg
1|2 cup gluten free bread crumbs
2 - 3 sprigs of minced green onion or thinly slice a shallot
1|4 c diced sweet red bell pepper
handful of chopped celery leaves or 1|4 diced celery ribs
fresh chopped parsley
juice of 1|2 lemon
1 T nutritional yeast
1 T dijon mustard
crushed red pepper or cayenne to taste
salt + pepper
olive oil for frying
DIRECTIONS
Mix everything into a large bowl. Adjust the bread crumbs accordingly if it seems to wet to form into patties that will hold their shape. Form into discs to fit your preference. Smaller ones are good on salads and with other vegetables but wider and thinner is best for a burger. Warm some olive oil in a saute pan on medium high heat. Fry each one about 5 - 6 minutes on each side until crisp and golden brown. Drain them on a paper towel and let them cool a minute just before serving.
ZIPPY CAESAR DRESSING
1 egg yolk
2 T of Vegenaise ( vegan mayo ) or greek yogurt for something tangy
1 T dijon mustard
1 clove of minced garlic
3 - 4 tablespoons good olive oil
2 anchovies ( optional )
pinch of cayenne
salt + pepper to taste
METHOD
Put everything into a blender and 1 T of the olive oil. With the motor running, slowly drizzle in the olive oil which will begin to emulsify and become creamy. Add more if you want a thinner dressing, or less if you want it thick. When all of the oil is incorporated, the dressing is ready to serve and will keep in the refrigerator for about a week or so.
ENJOY!!
Subscribe to:
Posts (Atom)